Javaweb-JSP
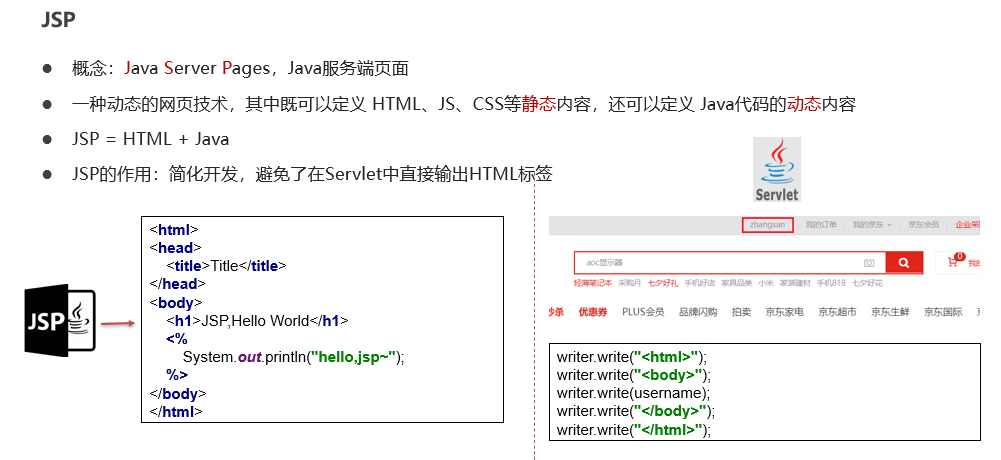
JSP:Java Server Pages,Java服务端页面
JSP 快速入门
1.导入JSP坐标 pom.xml
1
2
3
4
5
6
7
| <dependency>
<groupId>javax.servlet.jsp</groupId>
<artifactId>jsp-api</artifactId>
<version>2.2</version>
<scope>provided</scope> //这个不要忘了
</dependency>
|
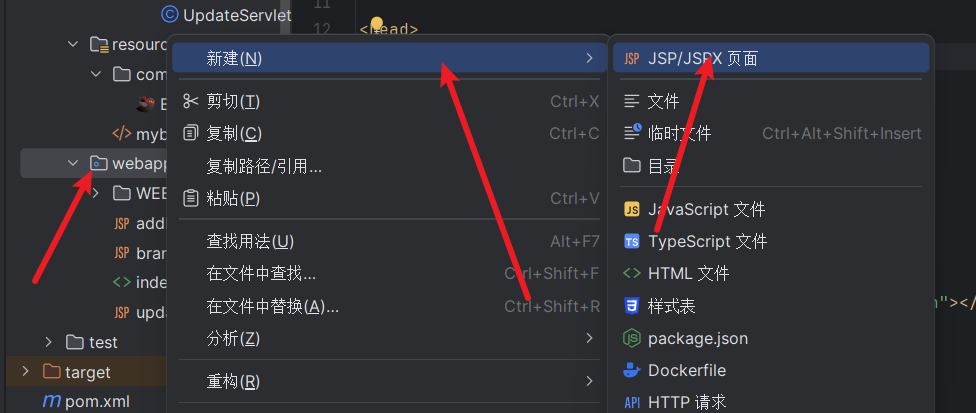
2.在webapp文件下 创建jsp文件
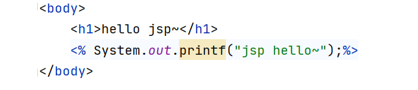
3.编写HTML标签 和 Java代码
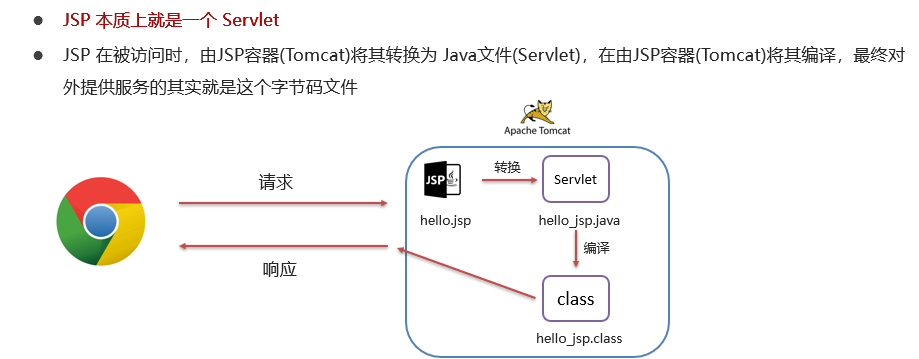
JSP原理
JSP脚本
JSP脚本用于在JSP页面内定义Java代码
JSP脚本分类:
<%...%>内容会直接放到_jspService()方法中<%=...%>内容会放到out.print()中,作为out.print()的参数<%!...%>内容会放到_jspService()方法之外,被类直接包含
JSP 缺点
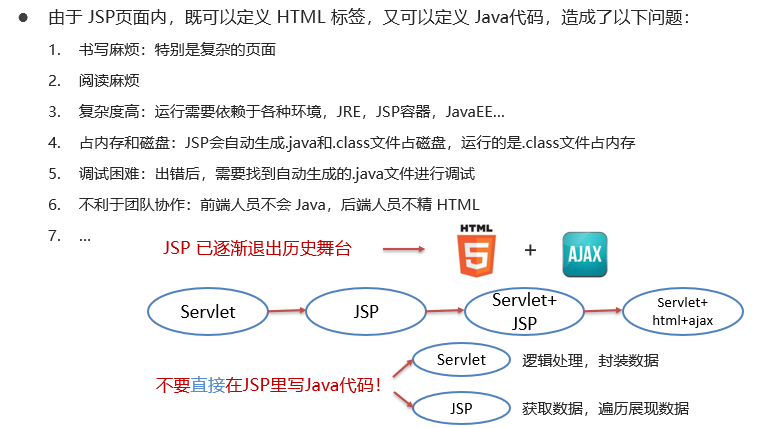
后续用html+ajax 替换jsp
EL表达式
- Expression Language 表达式语言,用于简化JSP页面内的Java代码
- 主要功能:获取数据
- 语法:
- : 获取域中存储的key为brands的数据
- JavaWeb 中的四大域对象:
- page:当前页面有效
- request:当前请求有效
- session:当前会话有效
- application:当前应用有效
el 表达式获取数据,会依次从这4个域中寻找,直到找到为止
JSTL 标签
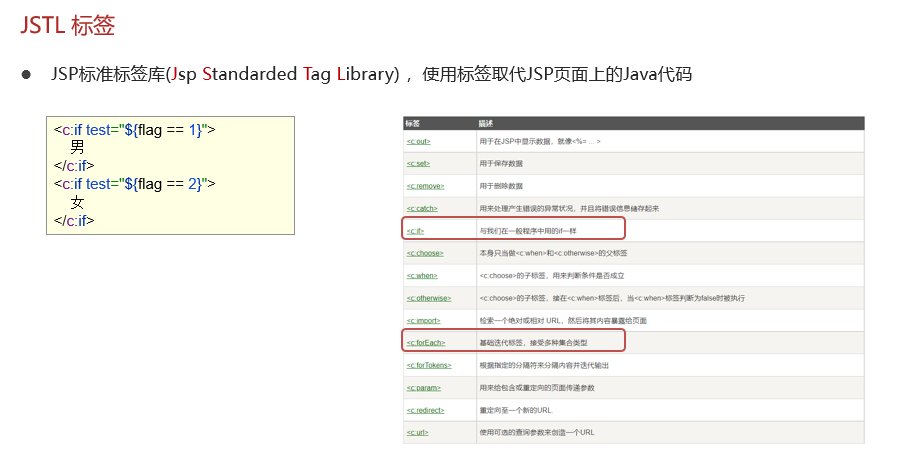
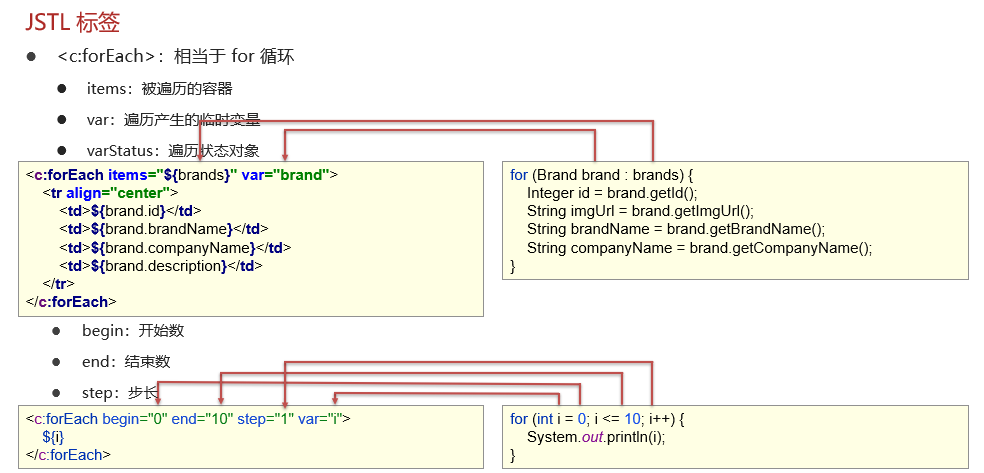
主要用 if 跟 foreach
JSTL 快速入门
1.导入坐标
1
2
3
4
5
6
7
8
9
10
11
|
<dependency>
<groupId>jstl</groupId>
<artifactId>jstl</artifactId>
<version>1.2</version>
</dependency>
<dependency>
<groupId>taglibs</groupId>
<artifactId>standard</artifactId>
<version>1.1.2</version>
</dependency>
|
2.在JSP页面上引入JSTL标签库
1
| <%@taglib prefix="c" uri="http://java.sun.com/jsp/jstl/core" %>
|
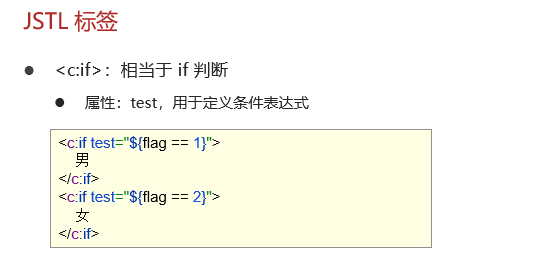
3.使用 <c:if>
1
2
3
4
5
6
7
8
9
10
11
12
13
14
15
16
17
18
19
20
21
22
23
24
25
26
27
28
29
30
31
32
33
34
35
36
37
38
39
40
41
42
43
44
45
46
47
48
49
50
51
52
53
54
55
56
| <%--
Created by IntelliJ IDEA.
User: V'jie
Date: 2024/7/22
Time: 15:16
To change this template use File | Settings | File Templates.
--%>
<%@ page contentType="text/html;charset=UTF-8" language="java" %>
<%@taglib prefix="c" uri="http://java.sun.com/jsp/jstl/core" %>
<html>
<head>
<title>Title</title>
</head>
<body>
<input type="button" value="新增" id="add"><br>
<hr>
<table border="1" cellspacing="0" width="80%">
<tr>
<th>序号</th>
<th>品牌名称</th>
<th>企业名称</th>
<th>排序</th>
<th>品牌介绍</th>
<th>状态</th>
<th>操作</th>
</tr>
<c:forEach items="${brands}" var="brand" varStatus="status">
<tr align="center">
<%-- <td>${brand.id}</td>--%>
<td>${status.count}</td>
<td>${brand.brandName}</td>
<td>${brand.companyName}</td>
<td>${brand.ordered}</td>
<td>${brand.description}</td>
<c:if test="${brand.status == 1}">
<td>启用</td>
</c:if>
<c:if test="${brand.status != 1}">
<td>禁用</td>
</c:if>
<td><a href="/brand-demo/selectByIdServlet?id=${brand.id}">修改</a> <a href="#">删除</a></td>
</tr>
</c:forEach>
</table>
<script>
document.getElementById("add").onclick = function (){
location.href = "/brand-demo/addBrand.jsp";
}
</script>
</body>
</html>
|
MVC模式和三层架构
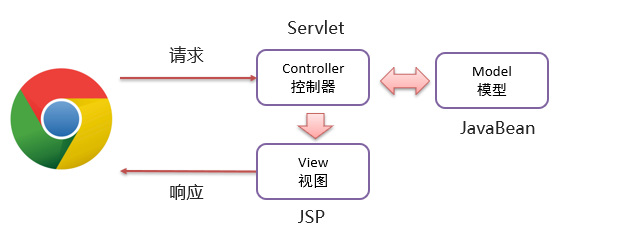
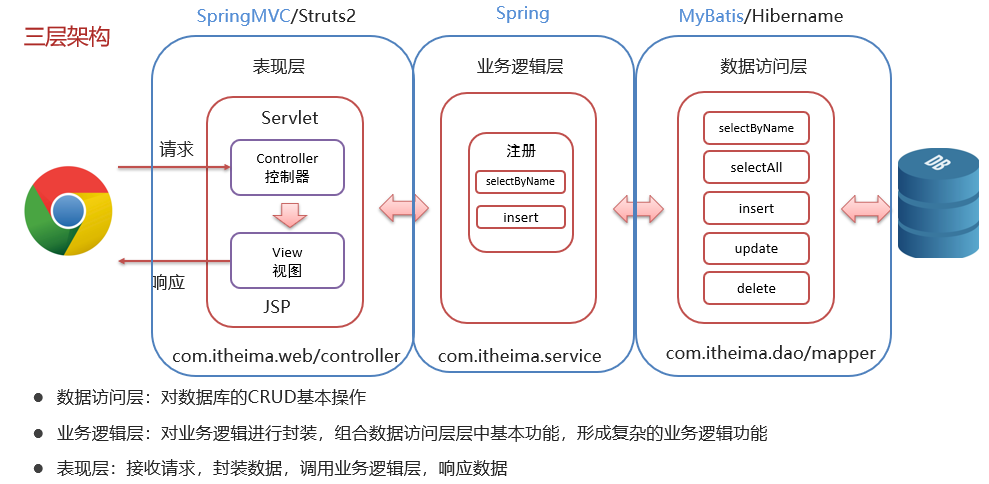
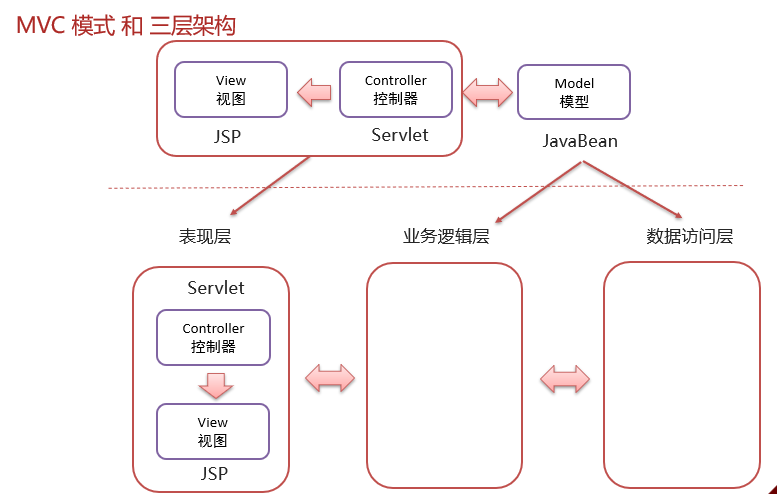
MVC是一种分层开发的模式
- M:Model,业务模型,处理业务
- V:View,视图,界面展示
- C:Controller,控制器,处理请求,调用模型和视图
MVC好处:
案例-完成品牌数据的增删改查操作
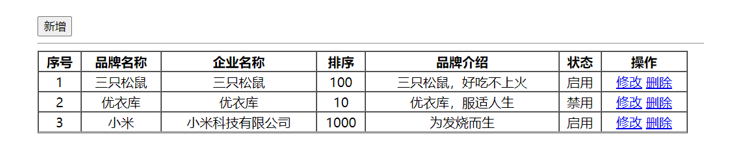
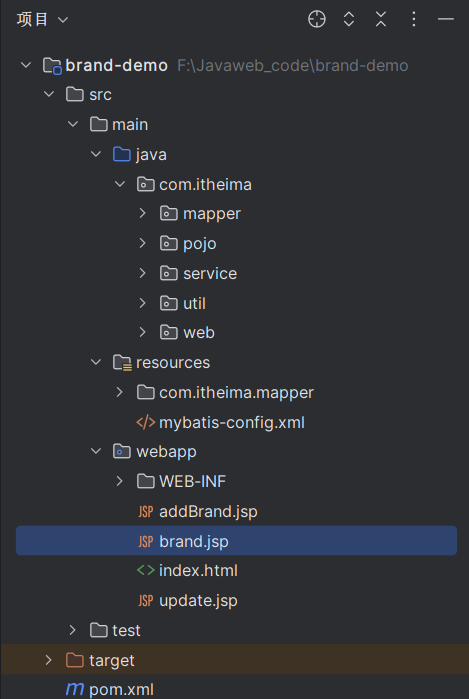
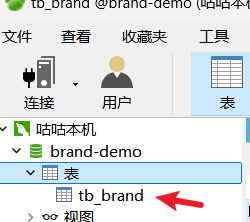
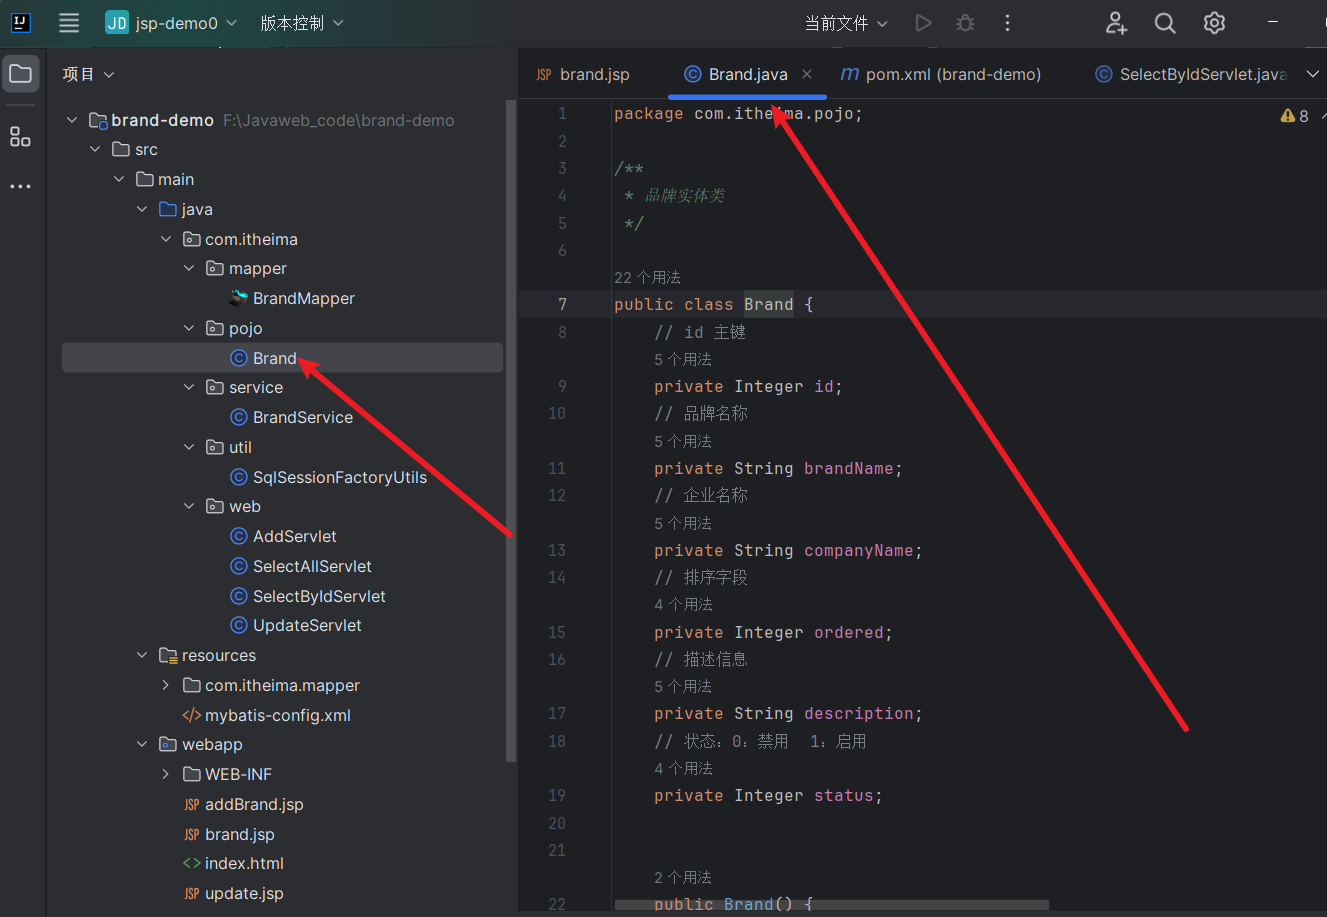
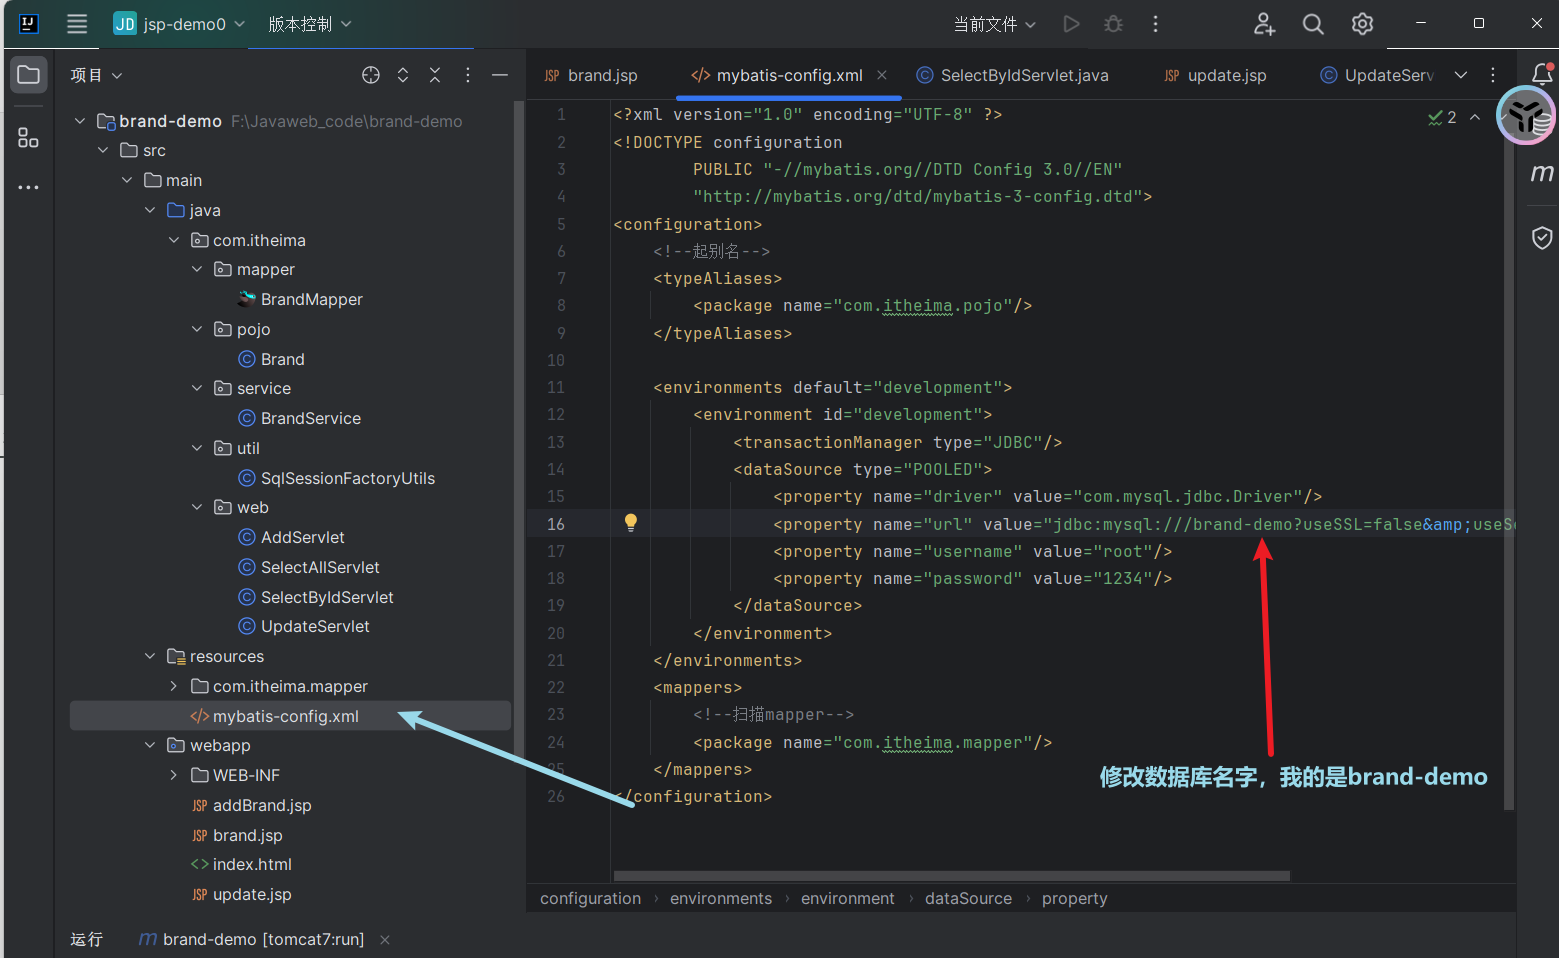
1. 准备环境
2. 查询所有
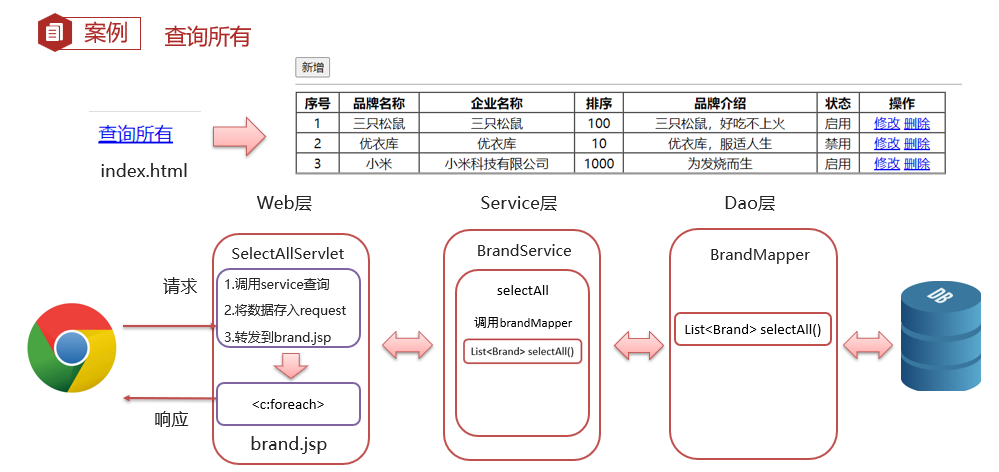
写网页 index.html
1
2
3
4
5
6
7
8
9
10
11
| <!DOCTYPE html>
<html lang="en">
<head>
<meta charset="UTF-8">
<title>Title</title>
</head>
<body>
<a href="/brand-demo/selectAllServlet">查询所有</a>
</body>
</html>
|
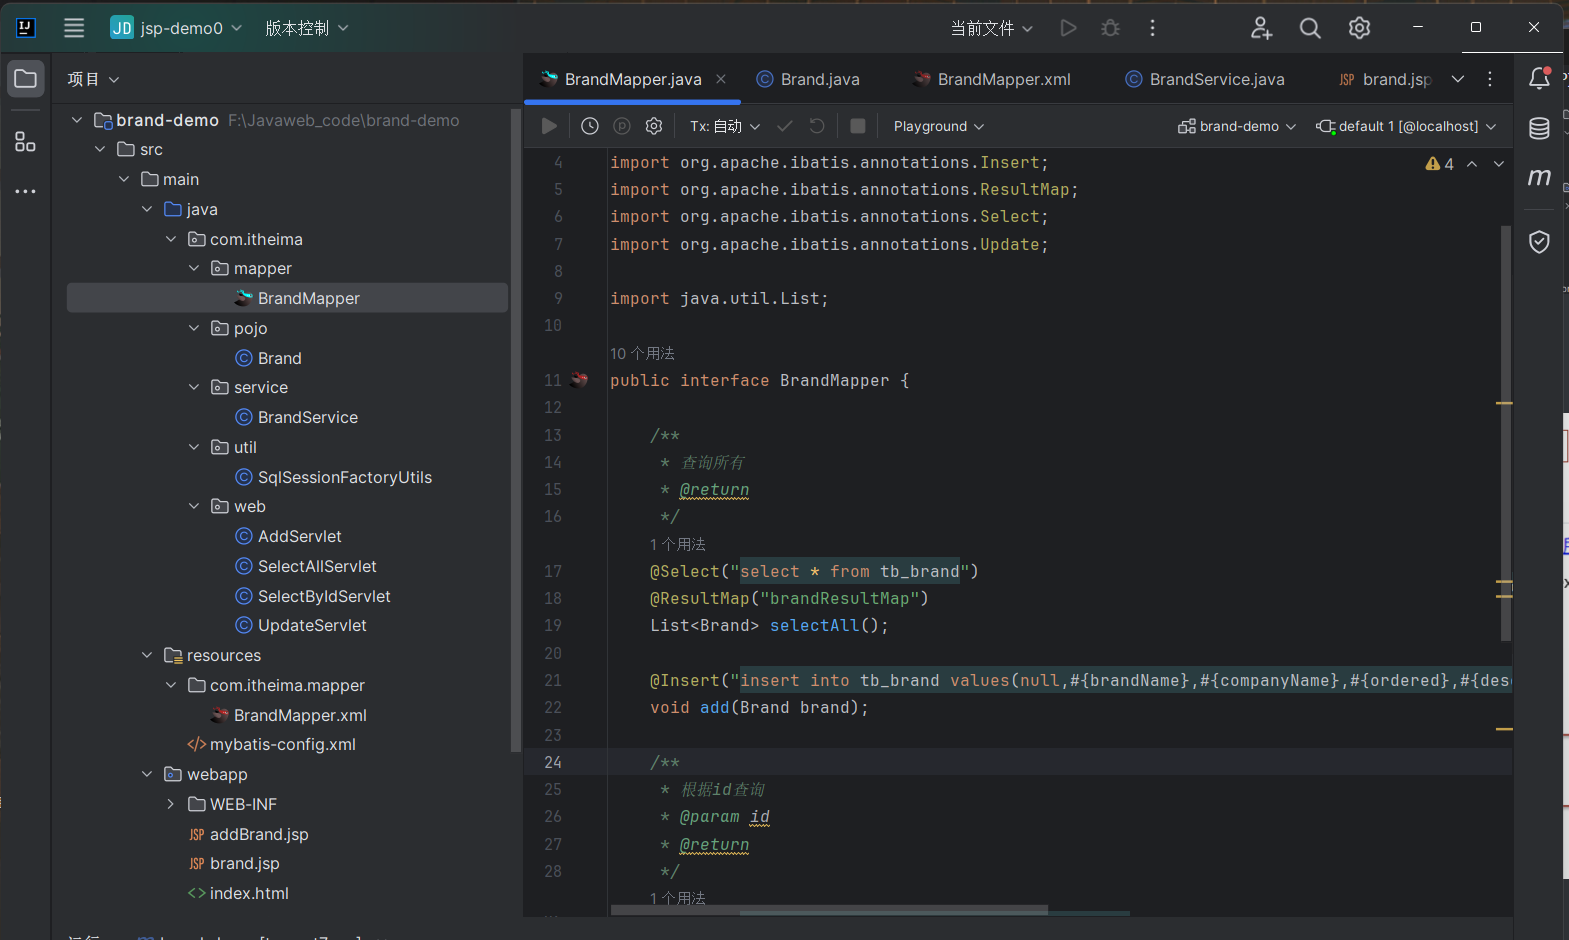
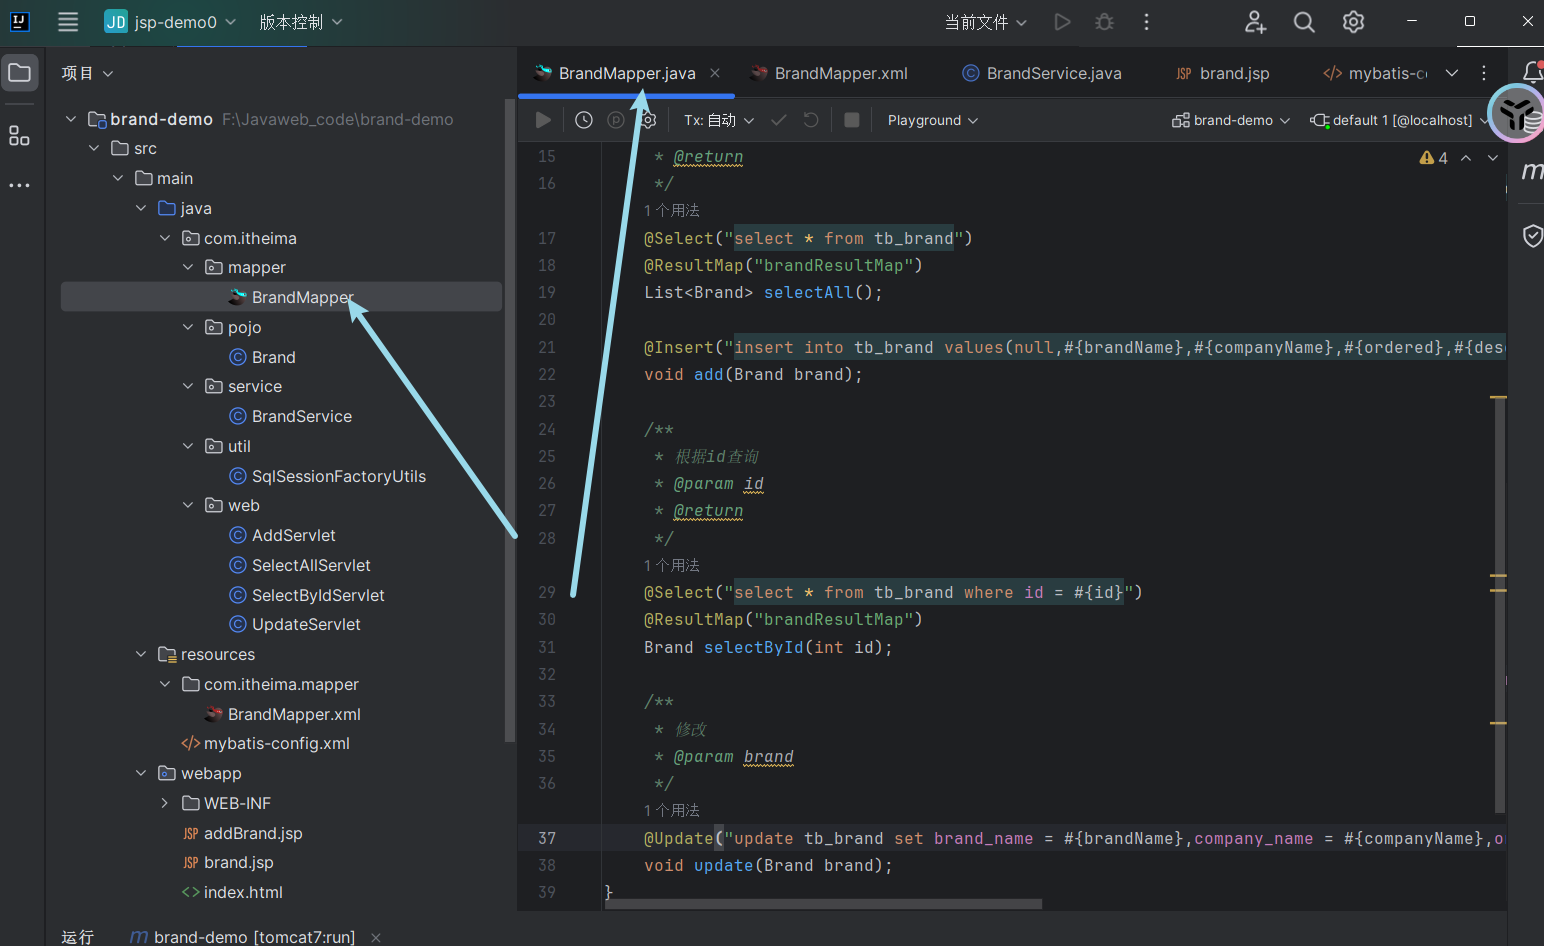
Step1: 数据层: 在BrandMapper中 使用注解的方式 实现查询所有
1
2
3
4
5
6
7
|
@Select("select * from tb_brand")
@ResultMap("brandResultMap")
List<Brand> selectAll();
|
Mapper相关的知识点
在MyBatis中,Mapper是一个核心的概念,它定义了映射到数据库操作的接口。Mapper是MyBatis的映射器接口,用于描述SQL语句和Java方法之间的映射关系,以及输入参数和输出结果之间的映射关系。Mapper接口是使用JDK代理生成的一个代理类。在编写MyBatis的程序时,常见的做法是编写一个Mapper接口,再编写相应的映射文件,之后便可以初始化MyBatis的环境,调用该接口的方法执行操作数据库的各中操作。MyBatis提供了注解来定义数据库操作,如@Select、@Insert、@Update等。这些注解可以直接写在Mapper接口的方法上,以定义该方法对应的SQL语句。
查询时 无名称,需要使用 ResultMap,进行映射
ResultMap详解
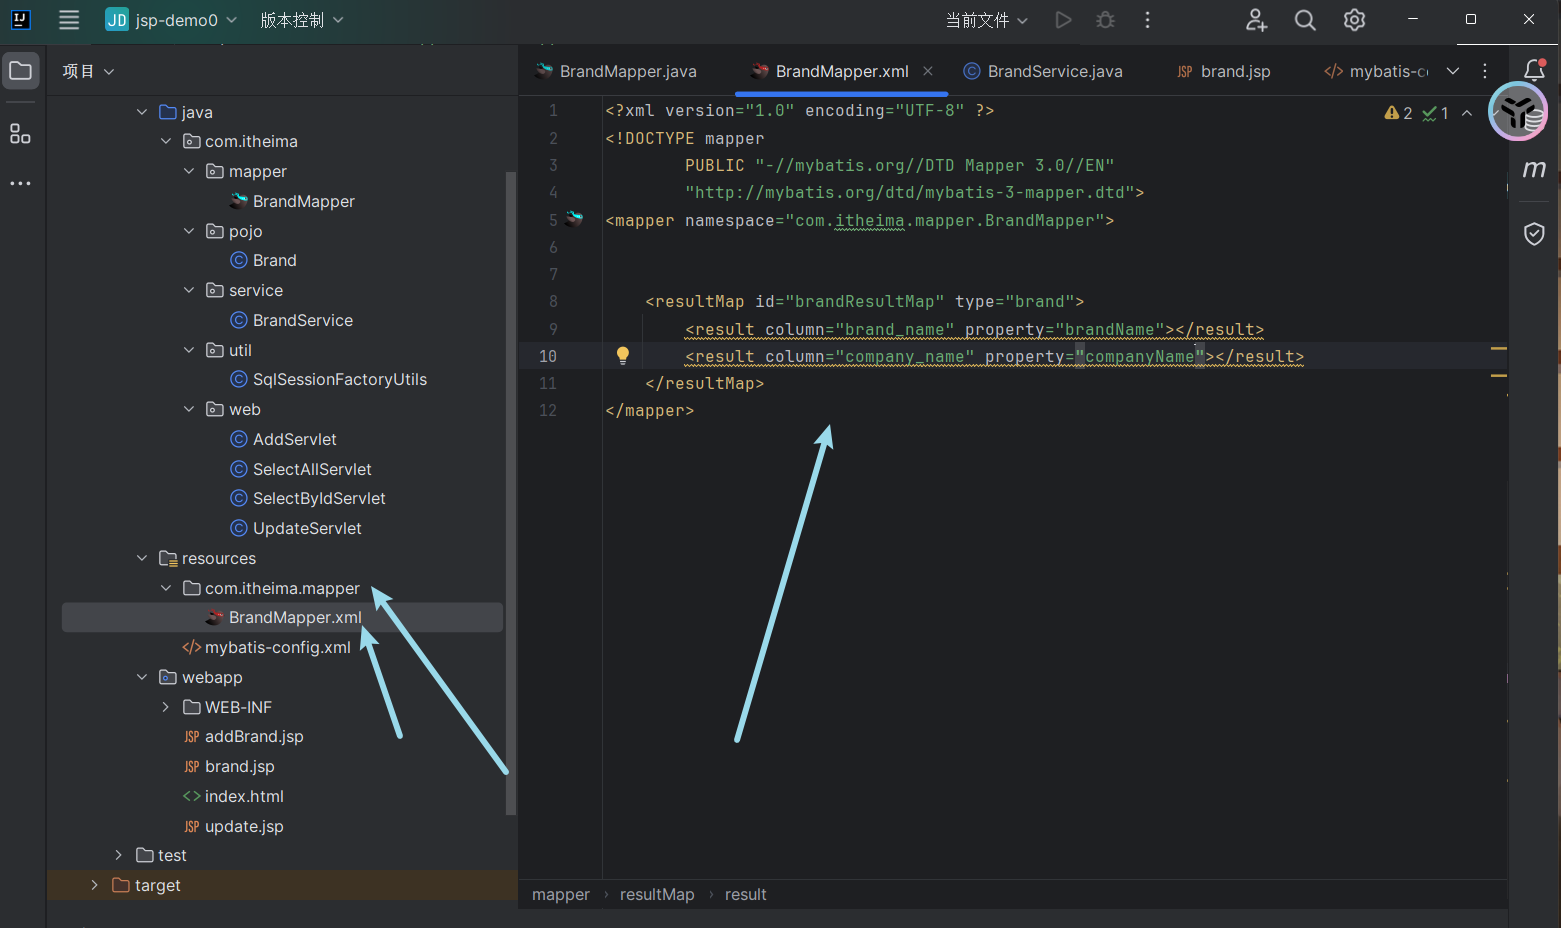
在这个代码中,BrandMapper接口和BrandMapper.xml文件共同定义了一个ResultMap,名为brandResultMap。这个ResultMap用于将SQL查询结果映射到BrandJava对象的属性中。
ResultMap的定义
在BrandMapper.xml文件中,ResultMap的定义如下:
1
2
3
4
| <resultMap id="brandResultMap" type="brand">
<result column="brand_name" property="brandName"></result>
<result column="company_name" property="companyName"></result>
</resultMap>
|
这里,id属性指定了ResultMap的名称为brandResultMap,而type属性指定了ResultMap映射到的Java对象类型为brand。
ResultMap的映射规则
在ResultMap中,定义了两个映射规则:
brand_name列映射到brandName属性company_name列映射到companyName属性
这意味着,当MyBatis执行SQL查询时,它会将查询结果中的brand_name和company_name列分别映射到Brand对象的brandName和companyName属性中。
ResultMap的作用
ResultMap的主要作用是简化对象关系映射(ORM)过程,使得开发人员不需要手动编写代码来映射SQL查询结果到Java对象中。通过定义ResultMap,MyBatis可以自动将SQL查询结果映射到Java对象中,减少了开发人员的工作量。
ResultMap的优点
使用ResultMap有以下优点:
- 简化ORM过程
- 减少开发人员的工作量
提高代码的可读性和可维护性
总结
ResultMap是MyBatis中用于定义对象关系映射的重要组件。通过定义ResultMap,开发人员可以简化ORM过程,减少工作量,并提高代码的可读性和可维护性。在你的代码中,brandResultMap ResultMap用于将SQL查询结果映射到BrandJava对象的属性中,展示了ResultMap的作用和优点。
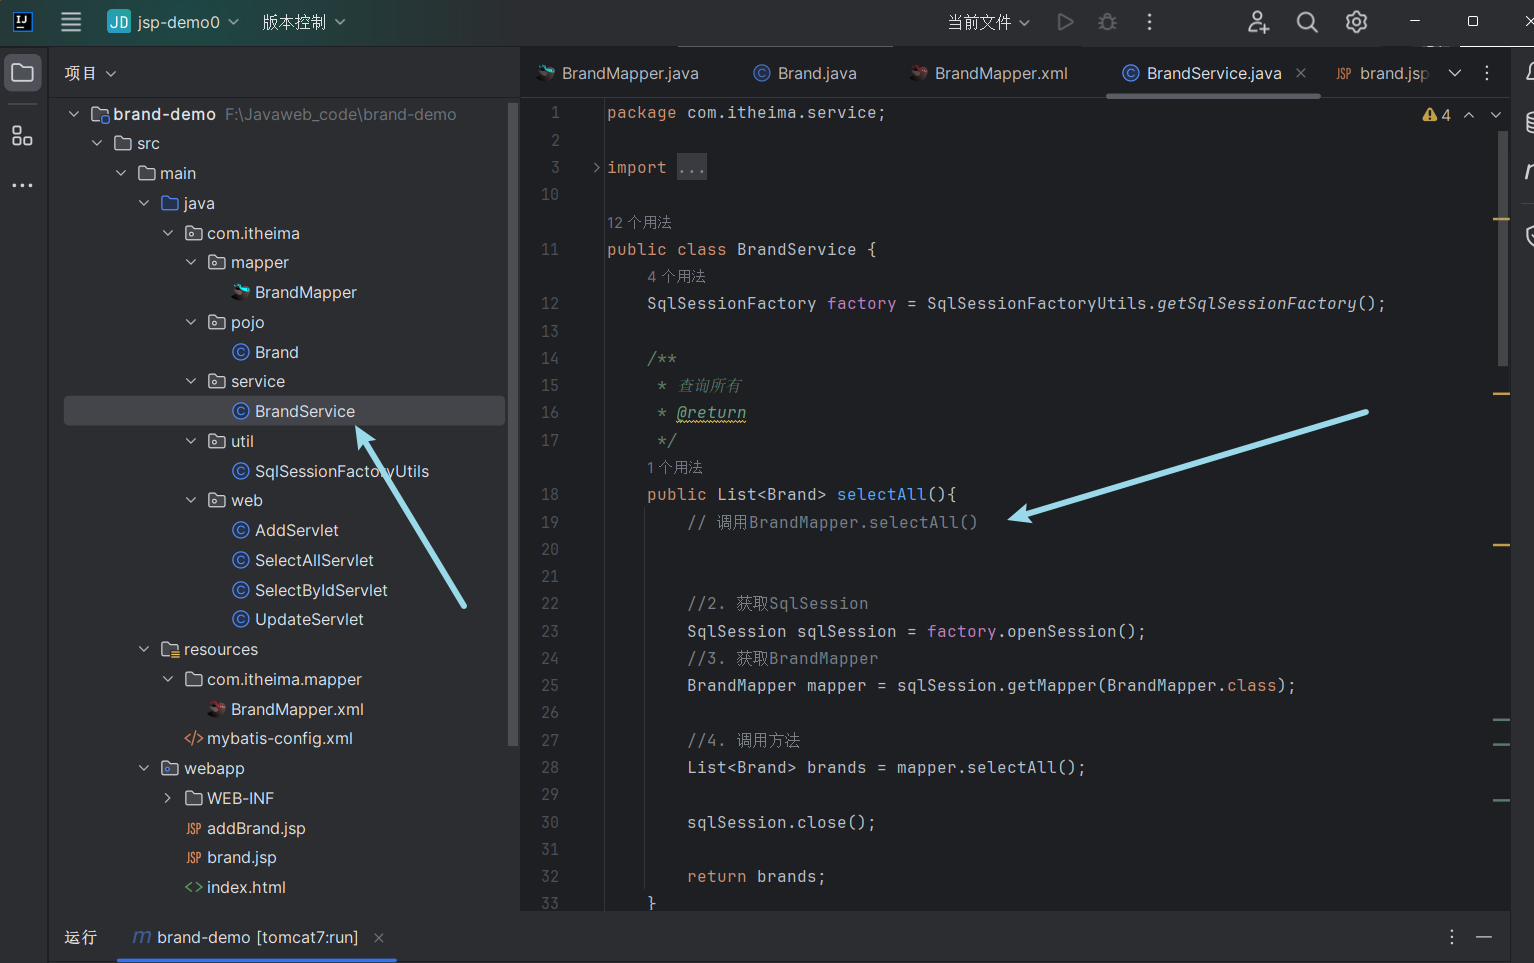
Step2: Service层 封装业务逻辑 调用
1
2
3
4
5
6
7
8
9
10
11
12
13
14
15
16
17
18
19
20
|
public List<Brand> selectAll(){
SqlSession sqlSession = factory.openSession();
BrandMapper mapper = sqlSession.getMapper(BrandMapper.class);
List<Brand> brands = mapper.selectAll();
sqlSession.close();
return brands;
}
|
每个方法的实现都遵循了以下步骤:
- 获取SqlSession对象
- 获取BrandMapper对象
- 调用BrandMapper对象的相应方法
- 提交事务(如果需要)
- 释放资源
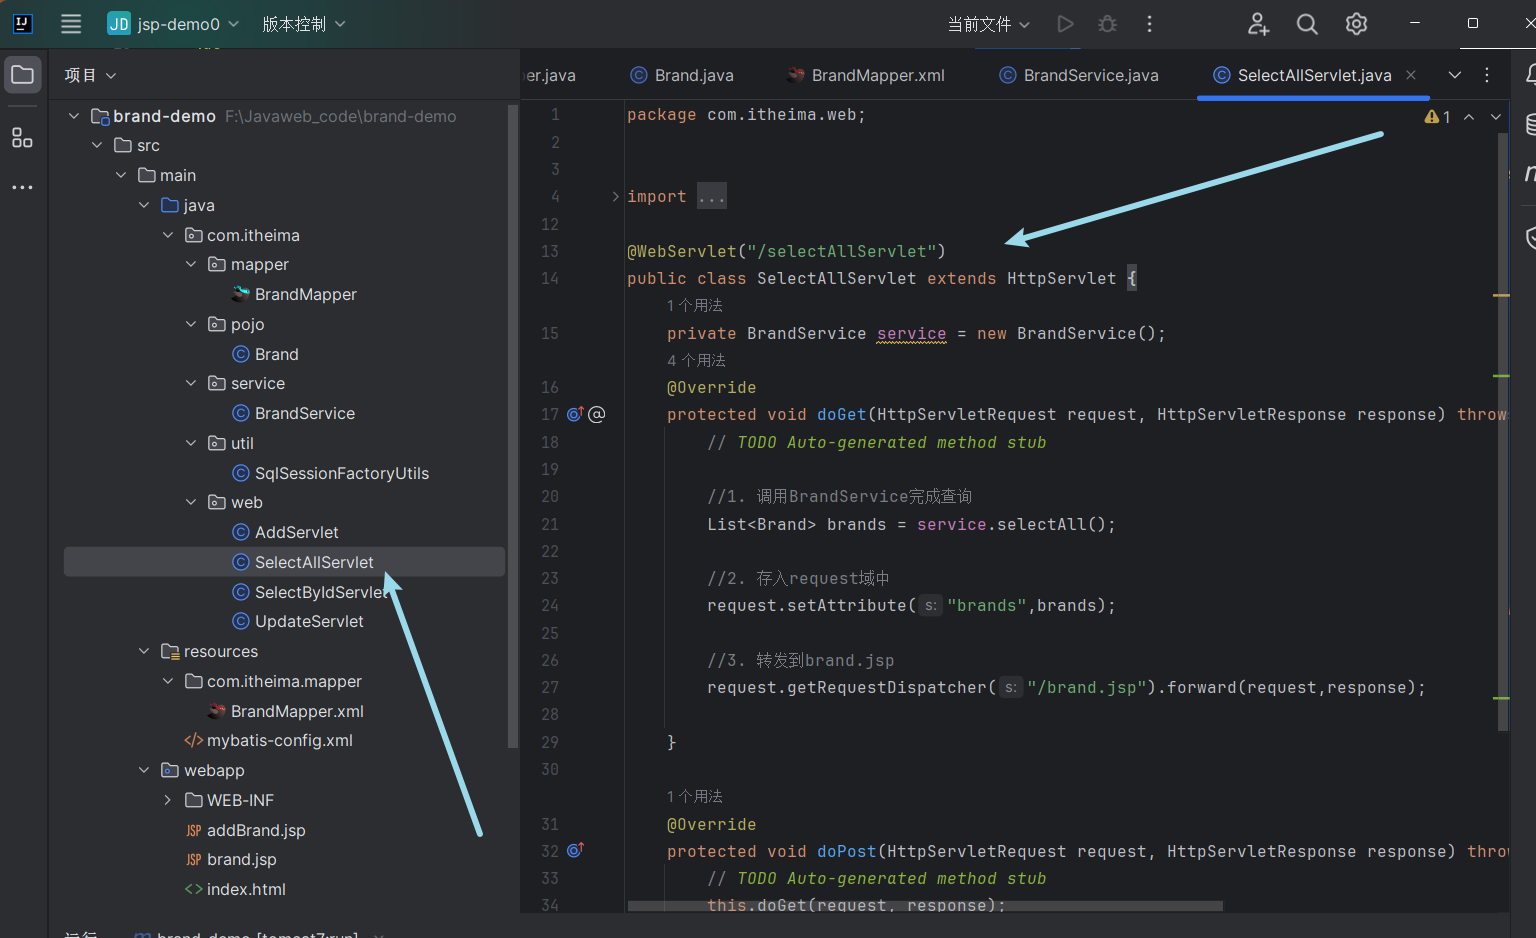
Step3:Web层
1
2
3
4
5
6
7
8
9
10
11
12
13
14
15
16
17
18
19
20
21
22
23
24
25
26
27
28
29
30
31
32
33
34
35
36
| package com.itheima.web;
import com.itheima.pojo.Brand;
import com.itheima.service.BrandService;
import javax.servlet.*;
import javax.servlet.http.*;
import javax.servlet.annotation.*;
import java.io.IOException;
import java.util.List;
@WebServlet("/selectAllServlet")
public class SelectAllServlet extends HttpServlet {
private BrandService service = new BrandService();
@Override
protected void doGet(HttpServletRequest request, HttpServletResponse response) throws ServletException, IOException {
List<Brand> brands = service.selectAll();
request.setAttribute("brands",brands);
request.getRequestDispatcher("/brand.jsp").forward(request,response);
}
@Override
protected void doPost(HttpServletRequest request, HttpServletResponse response) throws ServletException, IOException {
this.doGet(request, response);
}
}
|
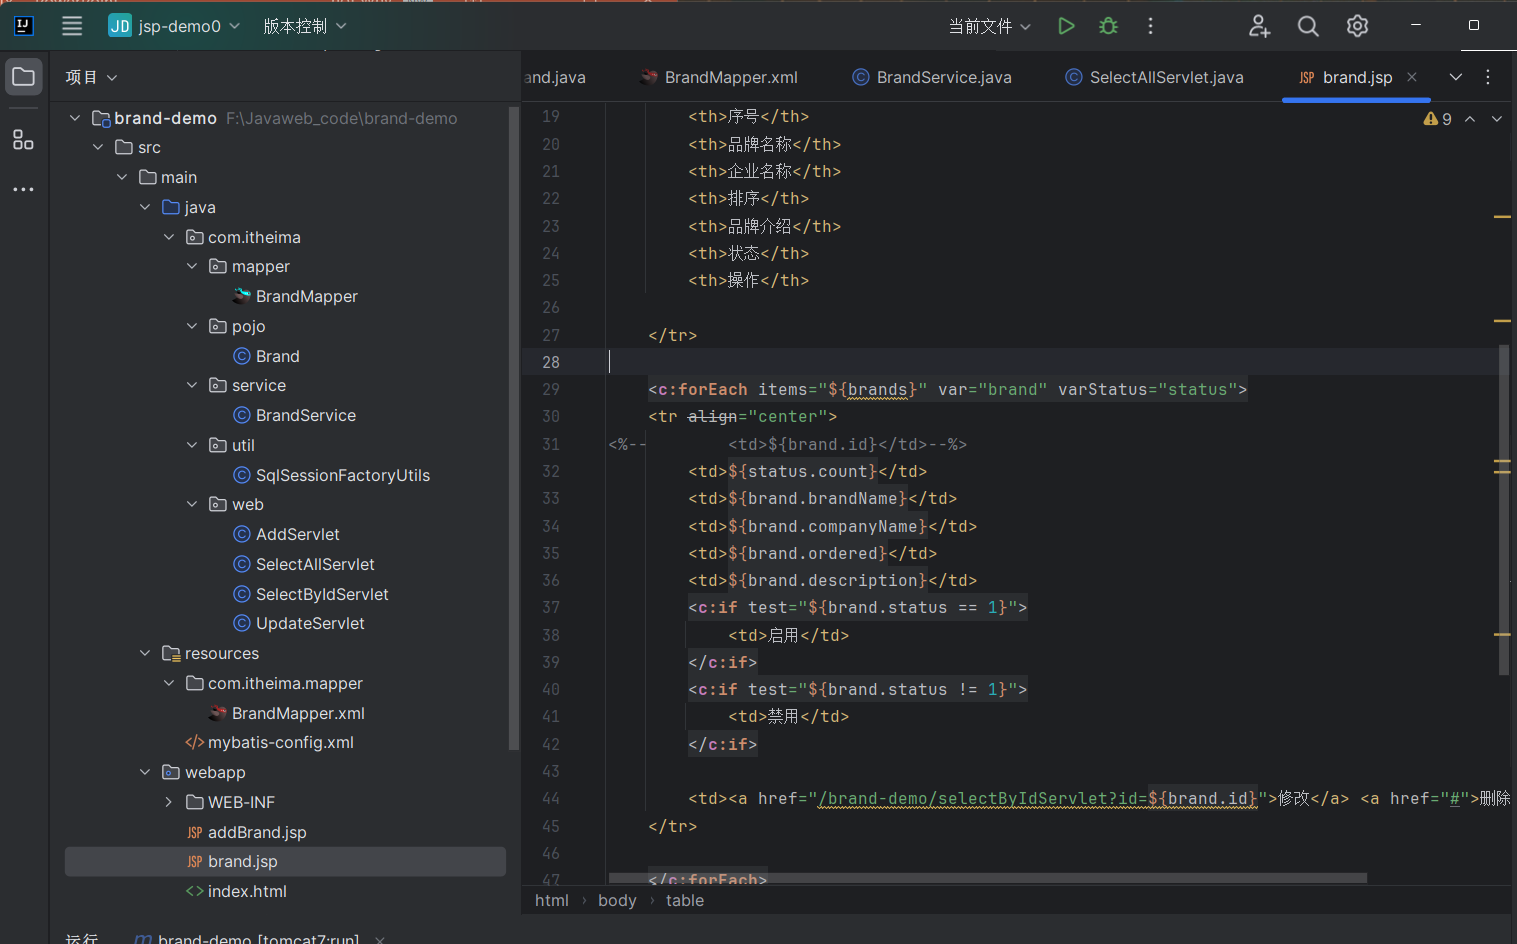
brand.jsp
1
2
3
4
5
6
7
8
9
10
11
12
13
14
15
16
17
18
19
20
21
22
23
24
25
26
27
28
29
30
31
32
33
34
35
36
37
38
39
40
41
42
43
44
45
46
47
48
49
50
51
52
53
54
55
56
57
58
59
| <%--
Created by IntelliJ IDEA.
User: V'jie
Date: 2024/7/22
Time: 15:16
To change this template use File | Settings | File Templates.
--%>
<%@ page contentType="text/html;charset=UTF-8" language="java" %>
<%@taglib prefix="c" uri="http://java.sun.com/jsp/jstl/core" %>
<html>
<head>
<title>Title</title>
</head>
<body>
<input type="button" value="新增" id="add"><br>
<hr>
<table border="1" cellspacing="0" width="80%">
<tr>
<th>序号</th>
<th>品牌名称</th>
<th>企业名称</th>
<th>排序</th>
<th>品牌介绍</th>
<th>状态</th>
<th>操作</th>
</tr>
<c:forEach items="${brands}" var="brand" varStatus="status">
<tr align="center">
<%-- <td>${brand.id}</td>--%>
<td>${status.count}</td>
<td>${brand.brandName}</td>
<td>${brand.companyName}</td>
<td>${brand.ordered}</td>
<td>${brand.description}</td>
<c:if test="${brand.status == 1}">
<td>启用</td>
</c:if>
<c:if test="${brand.status != 1}">
<td>禁用</td>
</c:if>
<td><a href="/brand-demo/selectByIdServlet?id=${brand.id}">修改</a> <a href="#">删除</a></td>
</tr>
</c:forEach>
</table>
<script>
document.getElementById("add").onclick = function (){
location.href = "/brand-demo/addBrand.jsp";
}
</script>
</body>
</html>
|
3. 添加
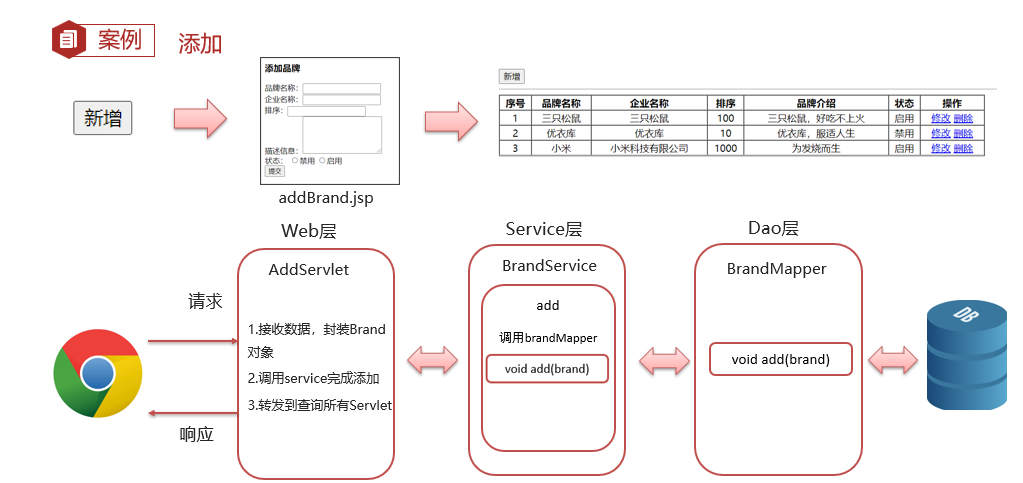
写网页 addBrand.jsp
1
2
3
4
5
6
7
8
9
10
11
12
13
14
15
16
17
18
19
20
21
22
23
24
25
26
27
28
29
30
| <%--
Created by IntelliJ IDEA.
User: V'jie
Date: 2024/7/22
Time: 19:19
To change this template use File | Settings | File Templates.
--%>
<%@ page contentType="text/html;charset=UTF-8" language="java" %>
<!DOCTYPE html>
<html lang="en">
<head>
<meta charset="UTF-8">
<title>添加品牌</title>
</head>
<body>
<h3>添加品牌</h3>
<form action="/brand-demo/addServlet" method="post">
品牌名称:<input name="brandName"><br>
企业名称:<input name="companyName"><br>
排序:<input name="ordered"><br>
描述信息:<textarea rows="5" cols="20" name="description"></textarea><br>
状态:
<input type="radio" name="status" value="0">禁用
<input type="radio" name="status" value="1">启用<br>
<input type="submit" value="提交">
</form>
</body>
</html>
|
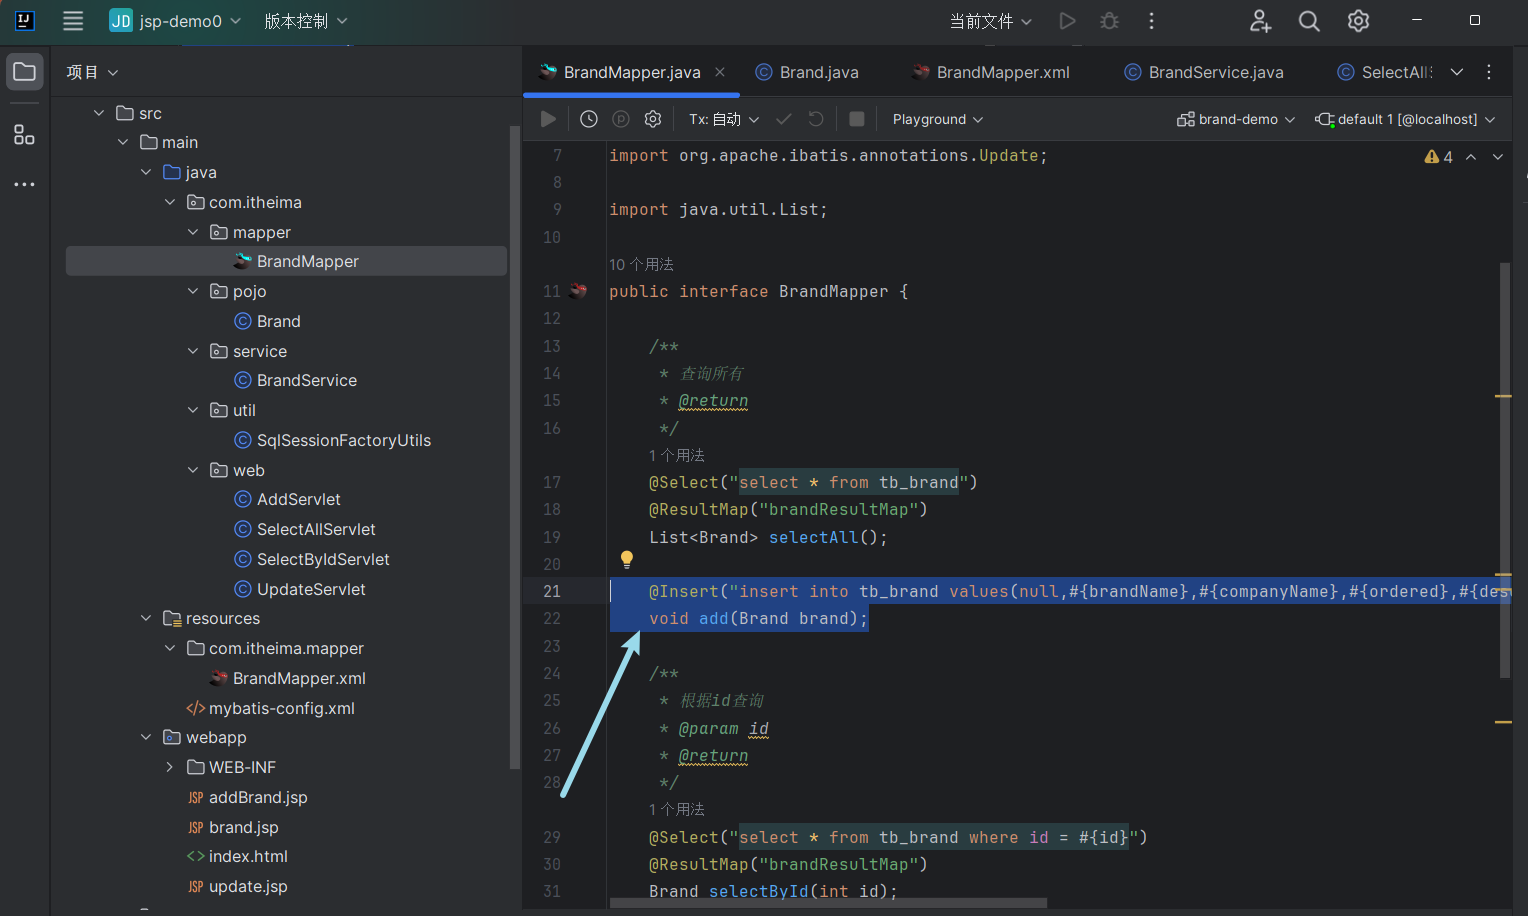
Step1:Dao层
1
2
| @Insert("insert into tb_brand values(null,#{brandName},#{companyName},#{ordered},#{description},#{status})")
void add(Brand brand);
|
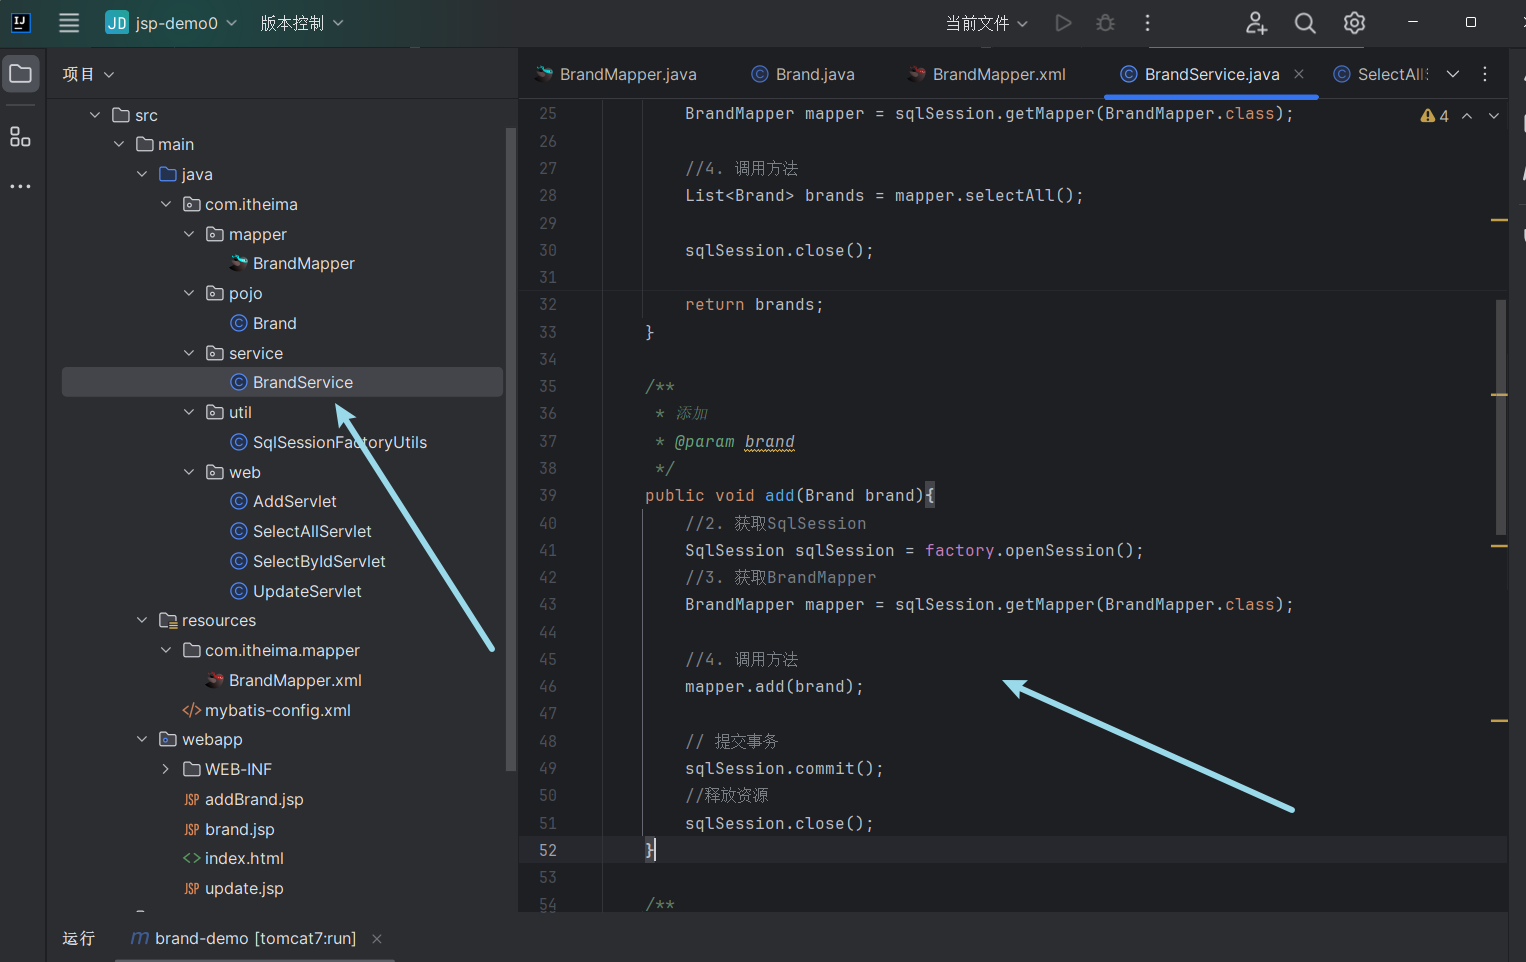
Step2:Service层 实现add业务逻辑
1
2
3
4
5
6
7
8
9
10
11
12
13
14
15
16
17
18
|
public void add(Brand brand){
SqlSession sqlSession = factory.openSession();
BrandMapper mapper = sqlSession.getMapper(BrandMapper.class);
mapper.add(brand);
sqlSession.commit();
sqlSession.close();
}
|
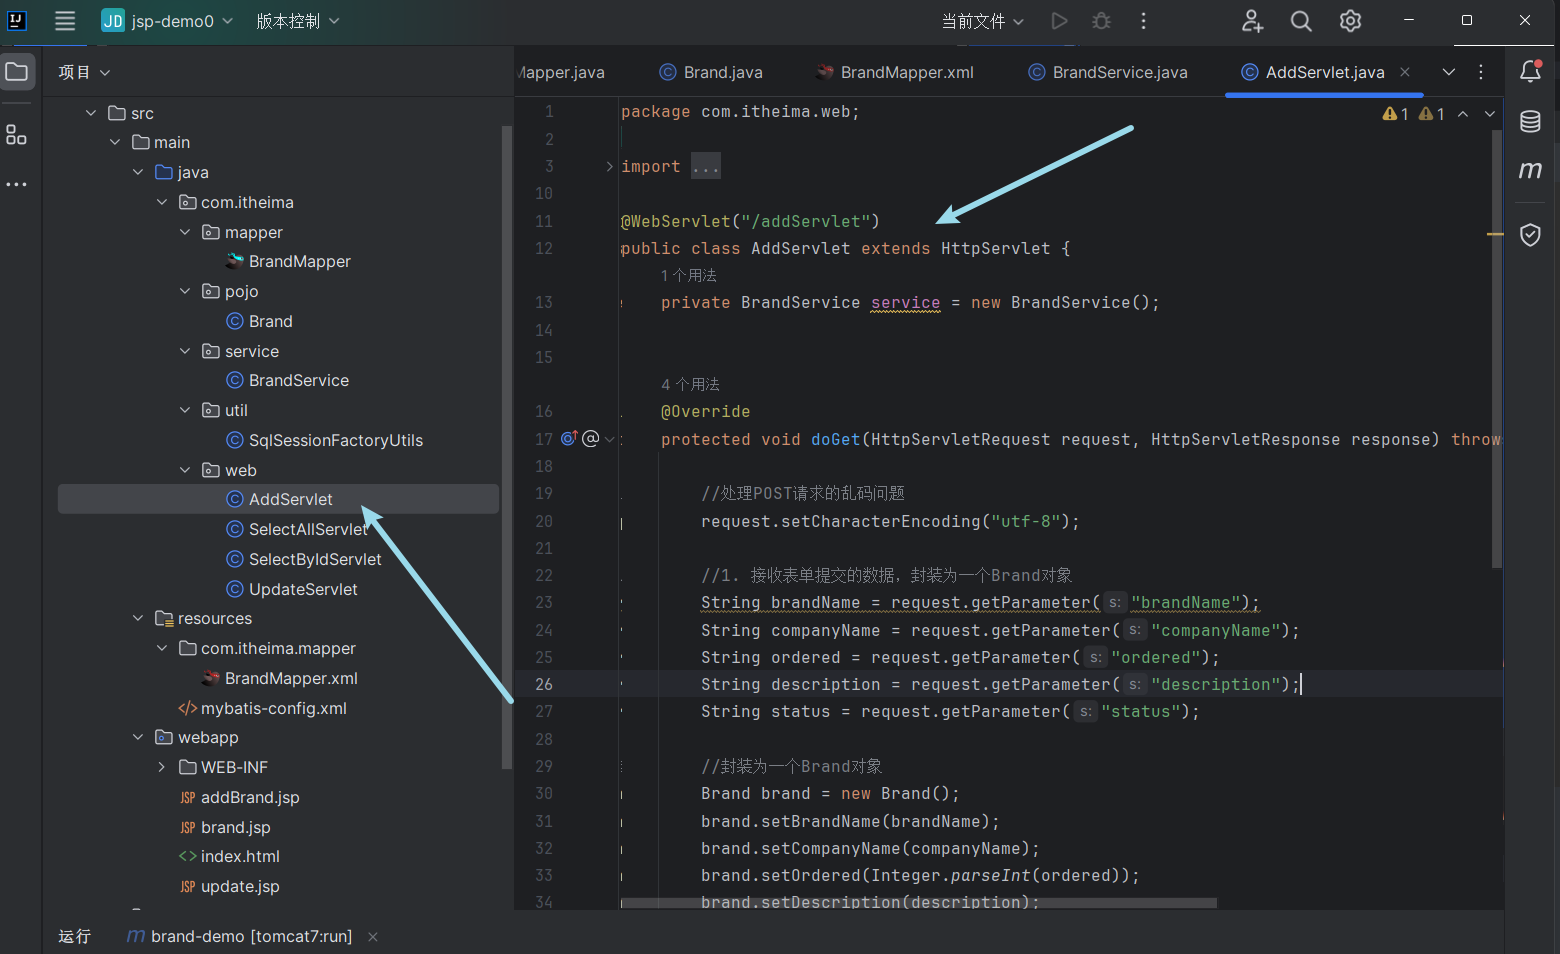
Step3:Web层
1
2
3
4
5
6
7
8
9
10
11
12
13
14
15
16
17
18
19
20
21
22
23
24
25
26
27
28
29
30
31
32
33
34
35
36
37
38
39
40
41
42
43
44
45
46
47
48
49
50
| package com.itheima.web;
import com.itheima.pojo.Brand;
import com.itheima.service.BrandService;
import javax.servlet.*;
import javax.servlet.http.*;
import javax.servlet.annotation.*;
import java.io.IOException;
@WebServlet("/addServlet")
public class AddServlet extends HttpServlet {
private BrandService service = new BrandService();
@Override
protected void doGet(HttpServletRequest request, HttpServletResponse response) throws ServletException, IOException {
request.setCharacterEncoding("utf-8");
String brandName = request.getParameter("brandName");
String companyName = request.getParameter("companyName");
String ordered = request.getParameter("ordered");
String description = request.getParameter("description");
String status = request.getParameter("status");
Brand brand = new Brand();
brand.setBrandName(brandName);
brand.setCompanyName(companyName);
brand.setOrdered(Integer.parseInt(ordered));
brand.setDescription(description);
brand.setStatus(Integer.parseInt(status));
service.add(brand);
request.getRequestDispatcher("/selectAllServlet").forward(request,response);
}
@Override
protected void doPost(HttpServletRequest request, HttpServletResponse response) throws ServletException, IOException {
this.doGet(request, response);
}
}
|
4. 修改-回显数据
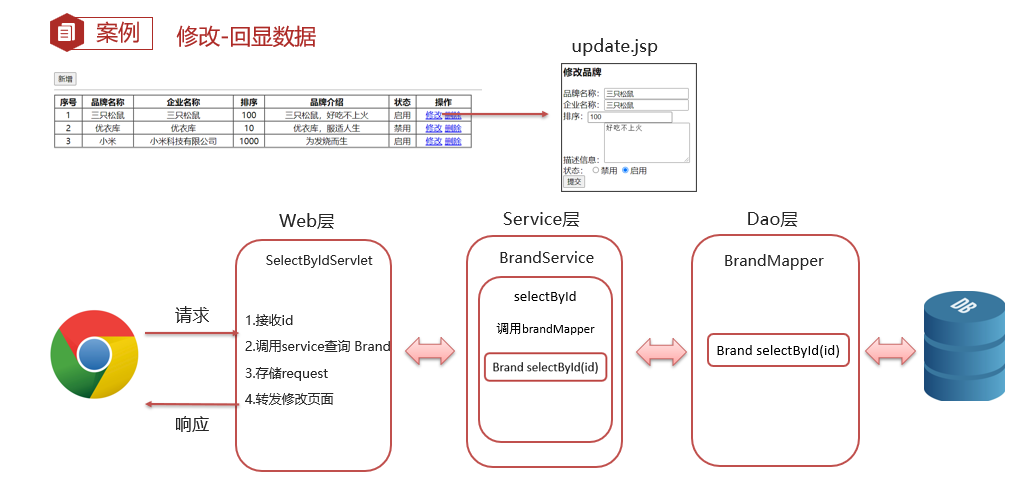
修改- 首先要实现回显数据,顾名思义就是 修改页面 保留原来的数据信息
1
2
3
4
5
6
7
8
9
10
11
12
13
14
15
16
17
18
19
20
21
22
23
24
25
26
27
28
29
30
31
32
33
34
35
36
37
38
39
40
41
42
43
| update.jsp
<%--
Created by IntelliJ IDEA.
User: V'jie
Date: 2024/7/22
Time: 19:19
To change this template use File | Settings | File Templates.
--%>
<%@ page contentType="text/html;charset=UTF-8" language="java" %>
<%@taglib prefix="c" uri="http://java.sun.com/jsp/jstl/core" %>
<!DOCTYPE html>
<html lang="en">
<head>
<meta charset="UTF-8">
<title>修改品牌</title>
</head>
<body>
<h3>修改品牌</h3>
<form action="/brand-demo/updateServlet" method="post">
<%--隐藏域,提交id--%>
<input type="hidden" name="id" value="${brand.id}">
品牌名称:<input name="brandName" value="${brand.brandName}"><br>
企业名称:<input name="companyName" value="${brand.companyName}"><br>
排序:<input name="ordered" value="${brand.ordered}"><br>
描述信息:<textarea rows="5" cols="20" name="description">${brand.description}</textarea><br>
状态:
<c:if test="${brand.status == 0}">
<input type="radio" name="status" value="0" checked>禁用
<input type="radio" name="status" value="1">启用<br>
</c:if>
<c:if test="${brand.status == 1}">
<input type="radio" name="status" value="0">禁用
<input type="radio" name="status" value="1" checked>启用<br>
</c:if>
<input type="submit" value="提交">
</form>
</body>
</html>
|
Step1: Dao层 在BrandMapper 中 编写操作数据库的映射代码
1
2
3
4
5
6
7
8
|
@Select("select * from tb_brand where id = #{id}")
@ResultMap("brandResultMap")
Brand selectById(int id);
|
Step2:Service层 在BrandService.java 中 实现业务逻辑 根据id查询 实现回显数据
1
2
3
4
5
6
7
8
9
10
11
12
13
14
15
16
17
18
19
20
|
public Brand selectById(int id){
SqlSession sqlSession = factory.openSession();
BrandMapper mapper = sqlSession.getMapper(BrandMapper.class);
Brand brand = mapper.selectById(id);
sqlSession.close();
return brand;
}
|
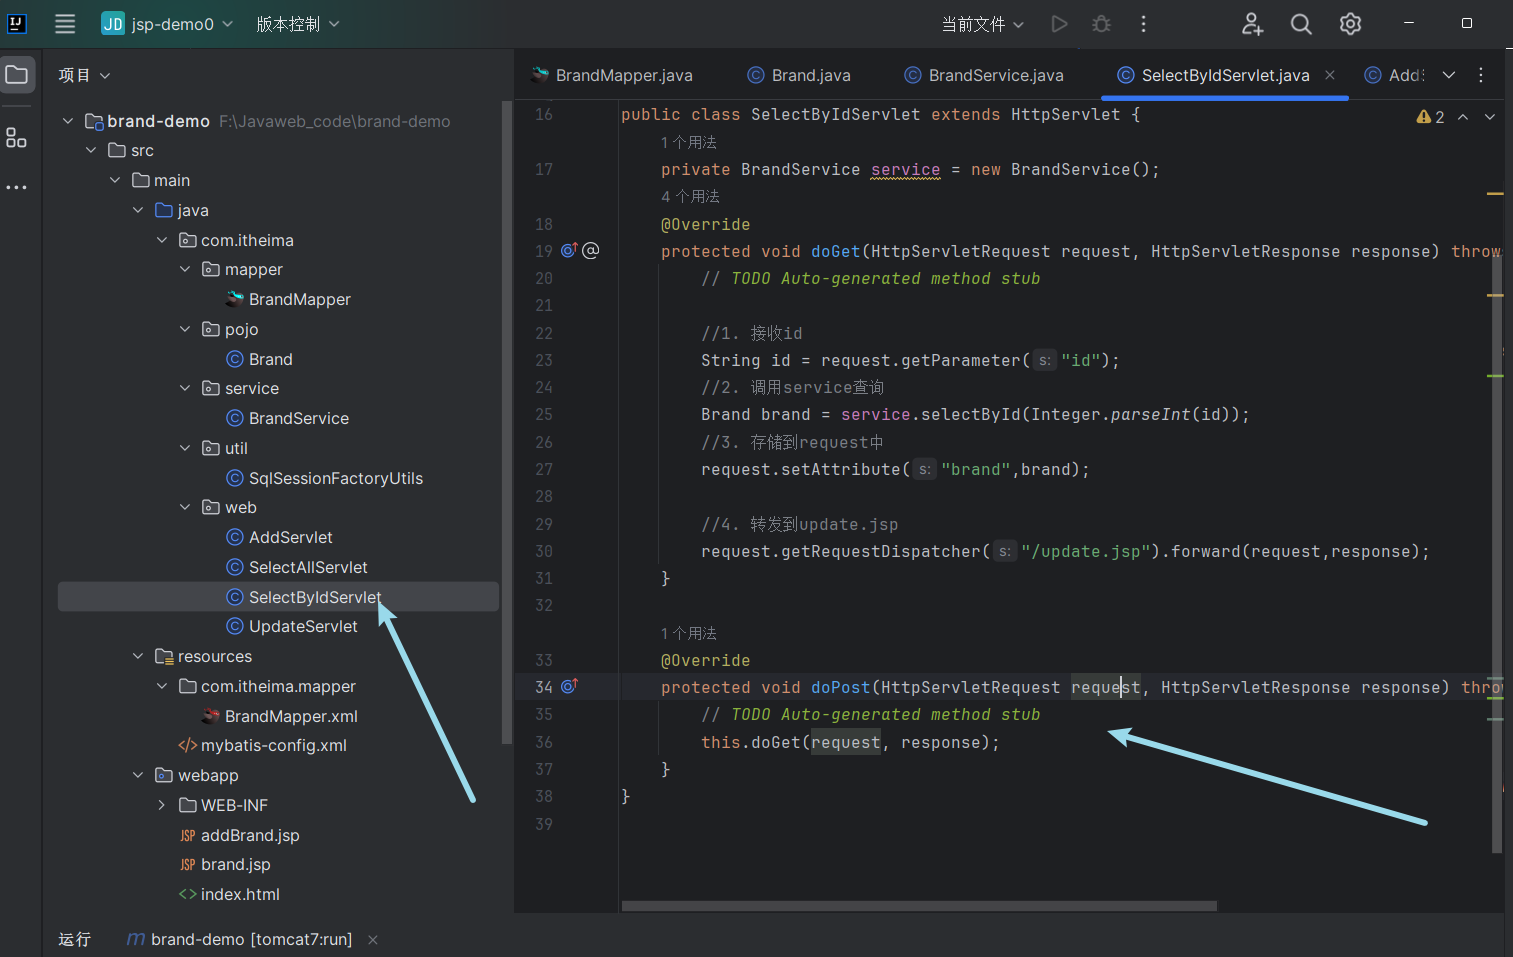
Step3:Web层
1
2
3
4
5
6
7
8
9
10
11
12
13
14
15
16
17
18
19
20
21
22
23
24
25
26
27
28
29
30
31
32
33
34
35
36
37
38
39
| package com.itheima.web;
import com.itheima.pojo.Brand;
import com.itheima.service.BrandService;
import javax.servlet.ServletException;
import javax.servlet.annotation.WebServlet;
import javax.servlet.http.HttpServlet;
import javax.servlet.http.HttpServletRequest;
import javax.servlet.http.HttpServletResponse;
import java.io.IOException;
import java.util.List;
@WebServlet("/selectByIdServlet")
public class SelectByIdServlet extends HttpServlet {
private BrandService service = new BrandService();
@Override
protected void doGet(HttpServletRequest request, HttpServletResponse response) throws ServletException, IOException {
String id = request.getParameter("id");
Brand brand = service.selectById(Integer.parseInt(id));
request.setAttribute("brand",brand);
request.getRequestDispatcher("/update.jsp").forward(request,response);
}
@Override
protected void doPost(HttpServletRequest request, HttpServletResponse response) throws ServletException, IOException {
this.doGet(request, response);
}
}
|
代码分析
该代码是一个Servlet,它负责接收一个ID参数,然后通过Service层查询对应的品牌数据,并将数据转发到一个JSP页面进行显示。整个过程遵循MVC模式。
MVC模式分析
在MVC模式中,Servlet扮演的是Controller的角色。它负责接收请求,处理业务逻辑,并将数据转发到View层(在本例中是JSP页面)。
代码的逻辑如下:
- 接收ID参数:Servlet接收一个ID参数,该参数用于查询对应的品牌数据。
- 查询品牌数据:Servlet通过
BrandService类查询对应的品牌数据。 - 存储数据:Servlet将查询到的品牌数据存储到request对象中。
转发数据:Servlet将request对象转发到update.jsp页面。
Servlet功能分析
Servlet的功能如下:
该代码是一个Servlet,它负责接收一个ID参数,然后通过Service层查询对应的品牌数据,并将数据转发到一个JSP页面进行显示。整个过程遵循MVC模式。通过分析代码逻辑和MVC模式,可以更好地理解Servlet的功能和作用。
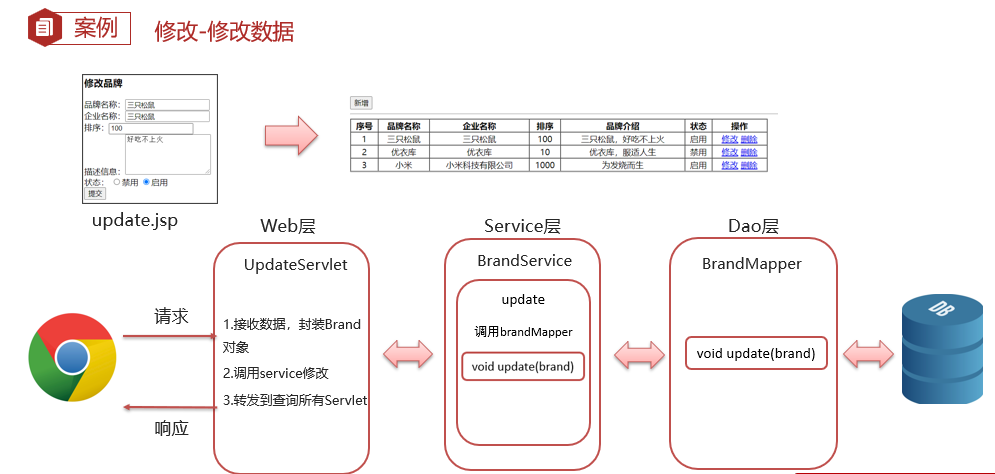
5.修改-修改数据
前面一步实现 回显数据,
Step1:Dao层
1
2
3
4
5
6
|
@Update("update tb_brand set brand_name = #{brandName},company_name = #{companyName},ordered = #{ordered},description = #{description},status = #{status} where id = #{id}")
void update(Brand brand);
|
Step2:Service层 在BrandService.java 业务逻辑层 实现代码
1
2
3
4
5
6
7
8
9
10
11
12
13
14
15
16
17
18
|
public void update(Brand brand){
SqlSession sqlSession = factory.openSession();
BrandMapper mapper = sqlSession.getMapper(BrandMapper.class);
mapper.update(brand);
sqlSession.commit();
sqlSession.close();
}
|
Step3:Web层 UpdateServlet
1
2
3
4
5
6
7
8
9
10
11
12
13
14
15
16
17
18
19
20
21
22
23
24
25
26
27
28
29
30
31
32
33
34
35
36
37
38
39
40
41
42
43
44
45
46
47
48
49
50
51
52
53
54
| package com.itheima.web;
import com.itheima.pojo.Brand;
import com.itheima.service.BrandService;
import javax.servlet.ServletException;
import javax.servlet.annotation.WebServlet;
import javax.servlet.http.HttpServlet;
import javax.servlet.http.HttpServletRequest;
import javax.servlet.http.HttpServletResponse;
import java.io.IOException;
@WebServlet("/updateServlet")
public class UpdateServlet extends HttpServlet {
private BrandService service = new BrandService();
@Override
protected void doGet(HttpServletRequest request, HttpServletResponse response) throws ServletException, IOException {
request.setCharacterEncoding("utf-8");
String id = request.getParameter("id");
String brandName = request.getParameter("brandName");
String companyName = request.getParameter("companyName");
String ordered = request.getParameter("ordered");
String description = request.getParameter("description");
String status = request.getParameter("status");
Brand brand = new Brand();
brand.setId(Integer.parseInt(id));
brand.setBrandName(brandName);
brand.setCompanyName(companyName);
brand.setOrdered(Integer.parseInt(ordered));
brand.setDescription(description);
brand.setStatus(Integer.parseInt(status));
service.update(brand);
request.getRequestDispatcher("/selectAllServlet").forward(request,response);
}
@Override
protected void doPost(HttpServletRequest request, HttpServletResponse response) throws ServletException, IOException {
this.doGet(request, response);
}
}
|
6.练习,实现删除数据功能
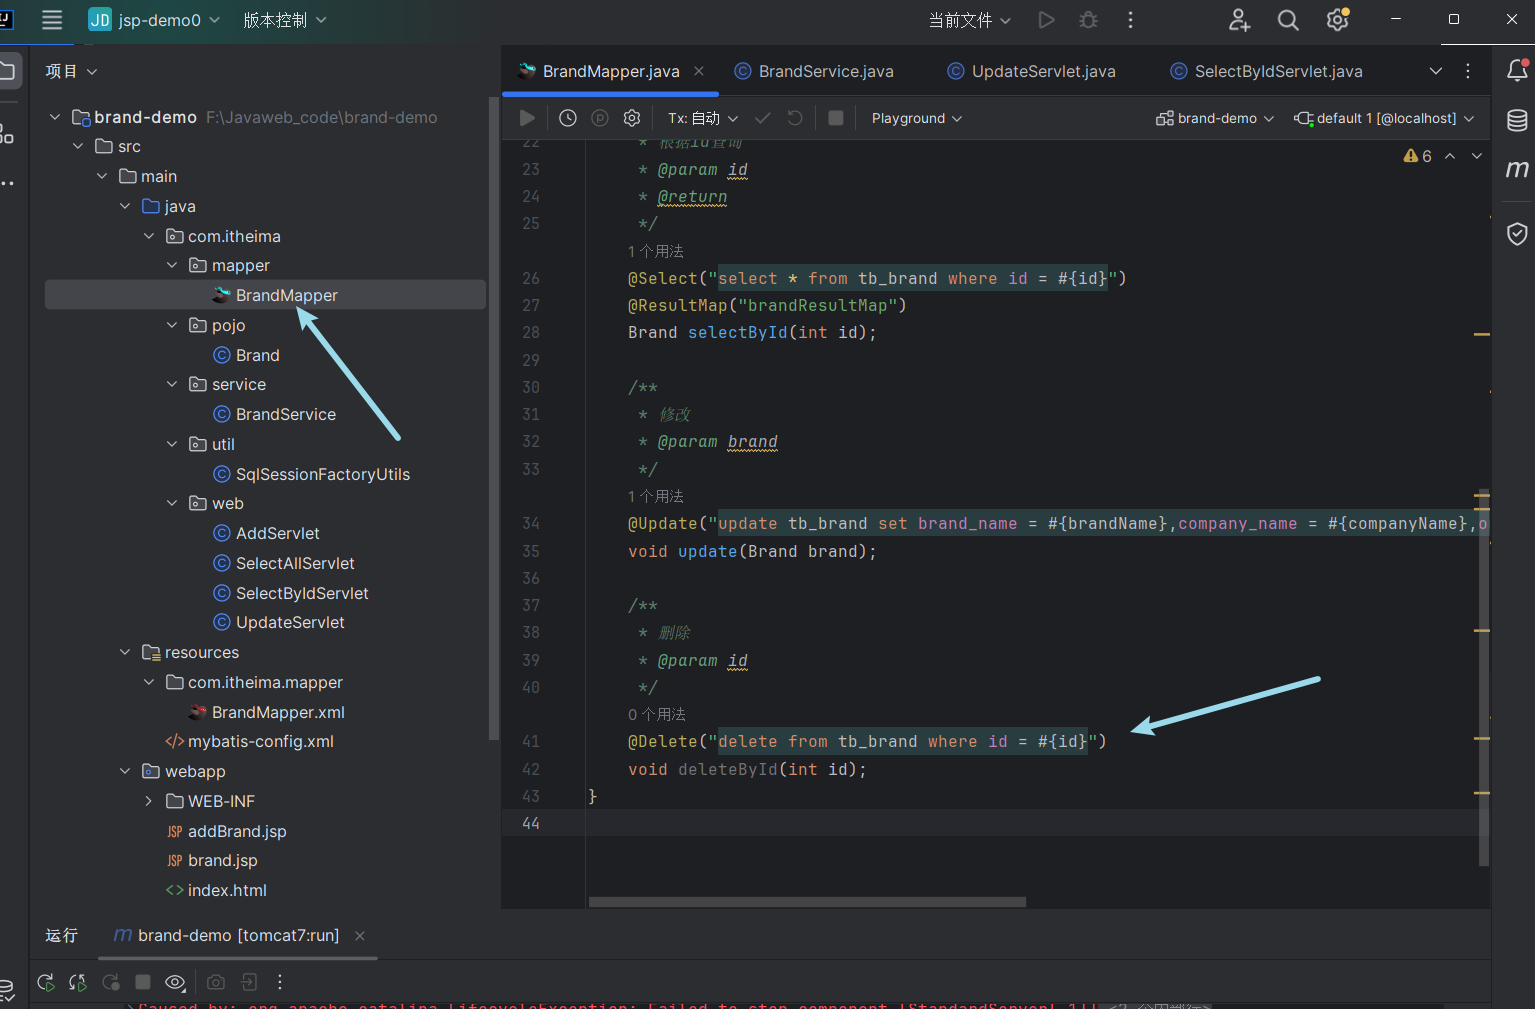
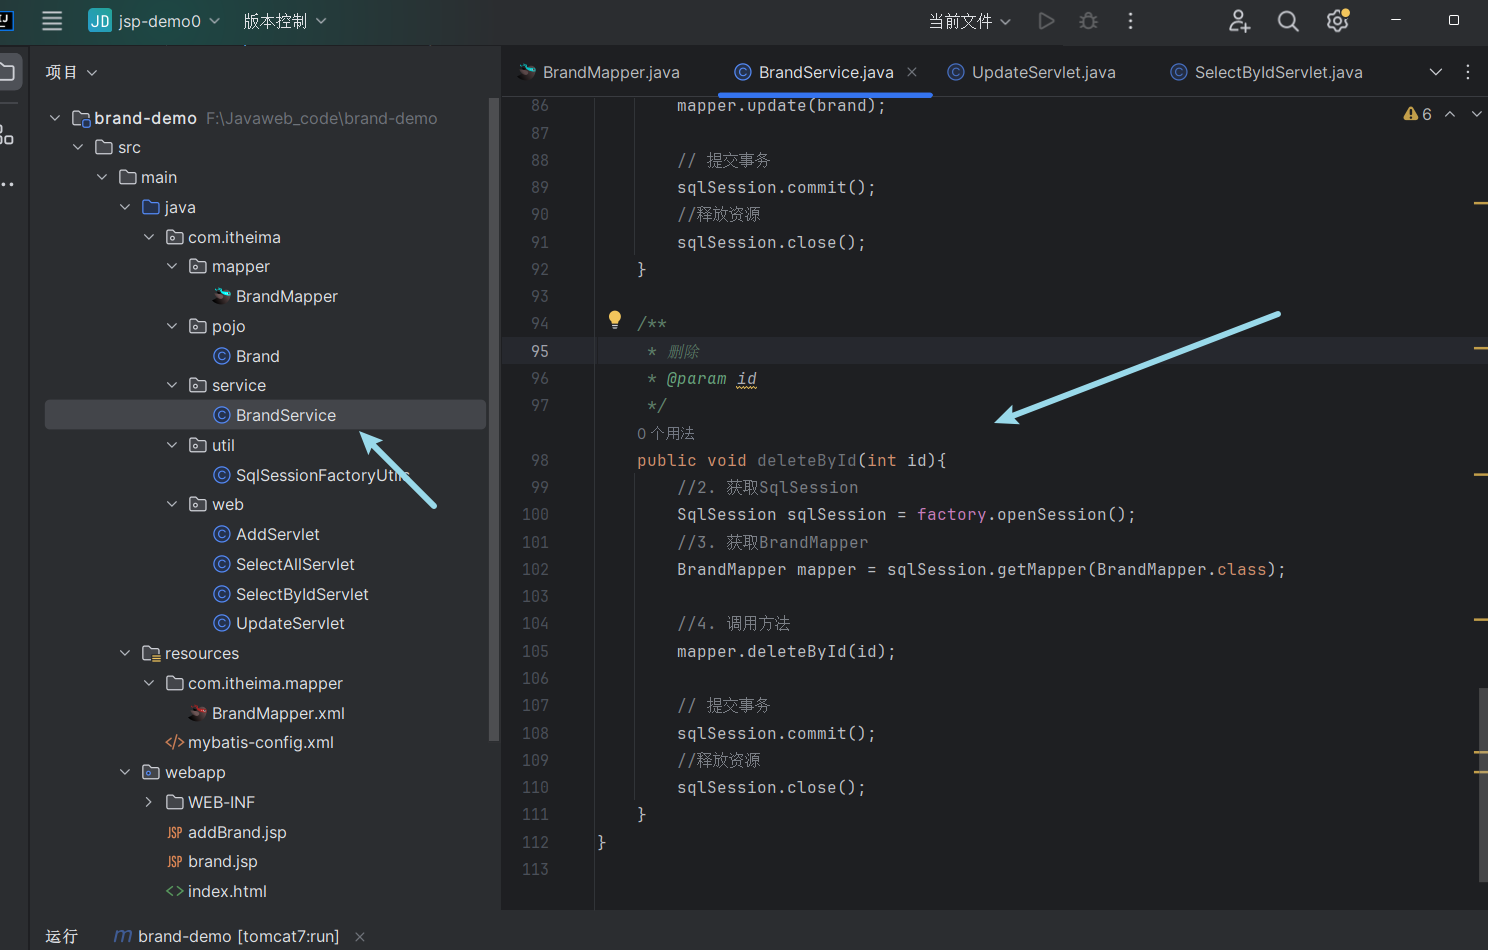
为了实现删除数据的功能,我们需要在BrandMapper接口中添加一个删除方法,在BrandService类中添加一个删除方法,并在DeleteServlet类中处理删除请求。
Step1:BrandMapper接口添加删除方法
Step2:在BrandService中添加 删除方法
Step3:Web层 实现DeleteServlet
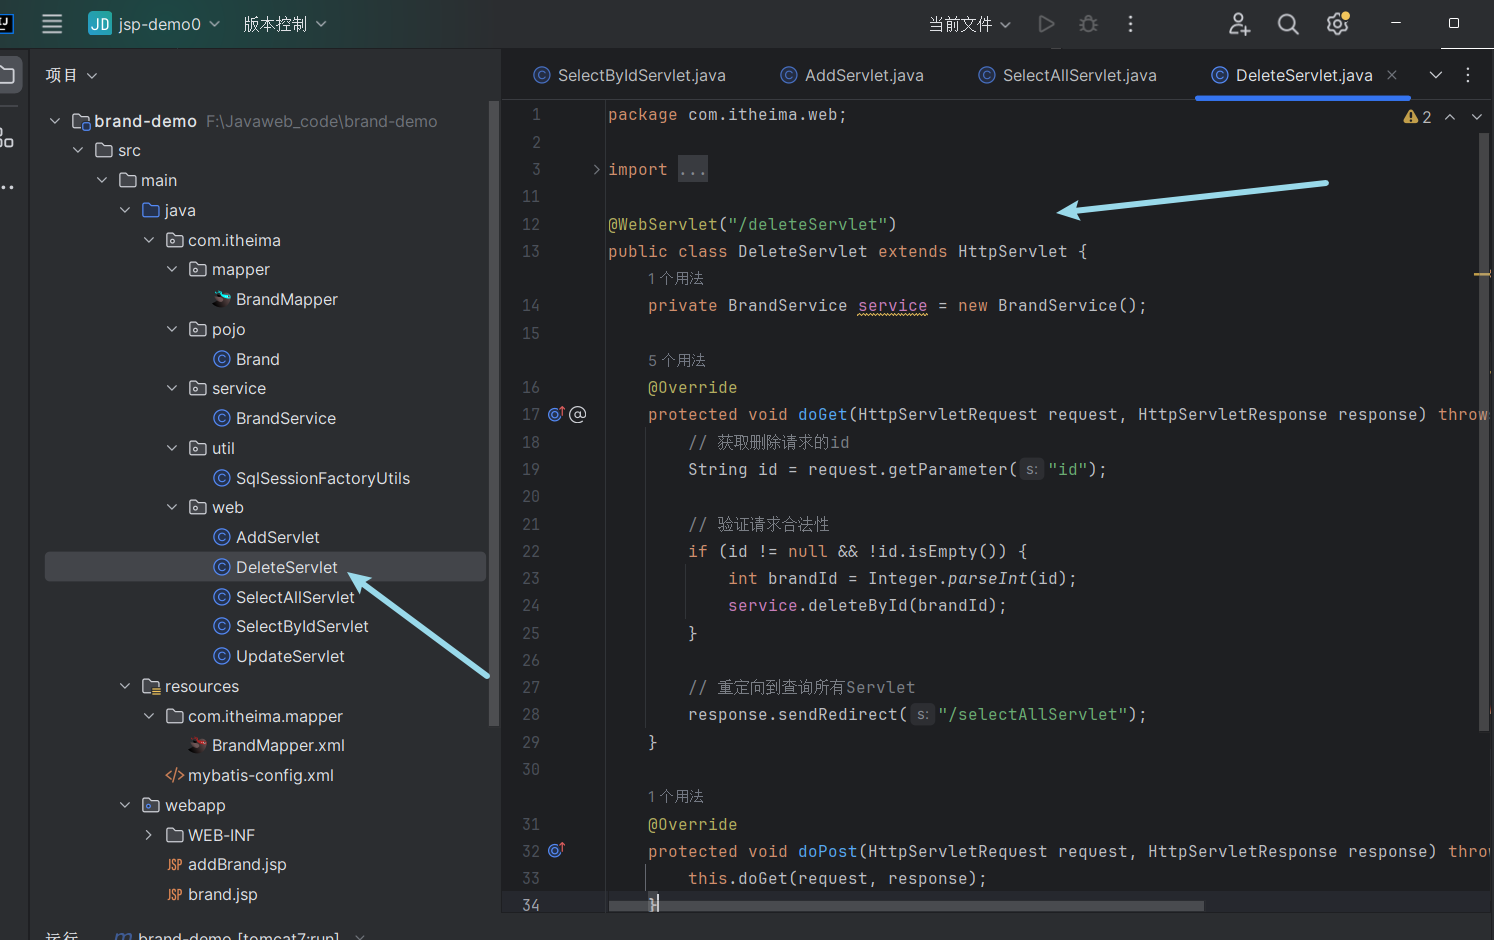
把重定向改成 转发到查询所有Servlet 因为重定向它会跳转页面,跳转的页面没实现就会错误,虽然实现了删除,转发到查询所有Servlet 就会在当前页面,并且删除后显示最新的数据。
Step4:删除按钮 在brand.jsp页面添加删除按钮
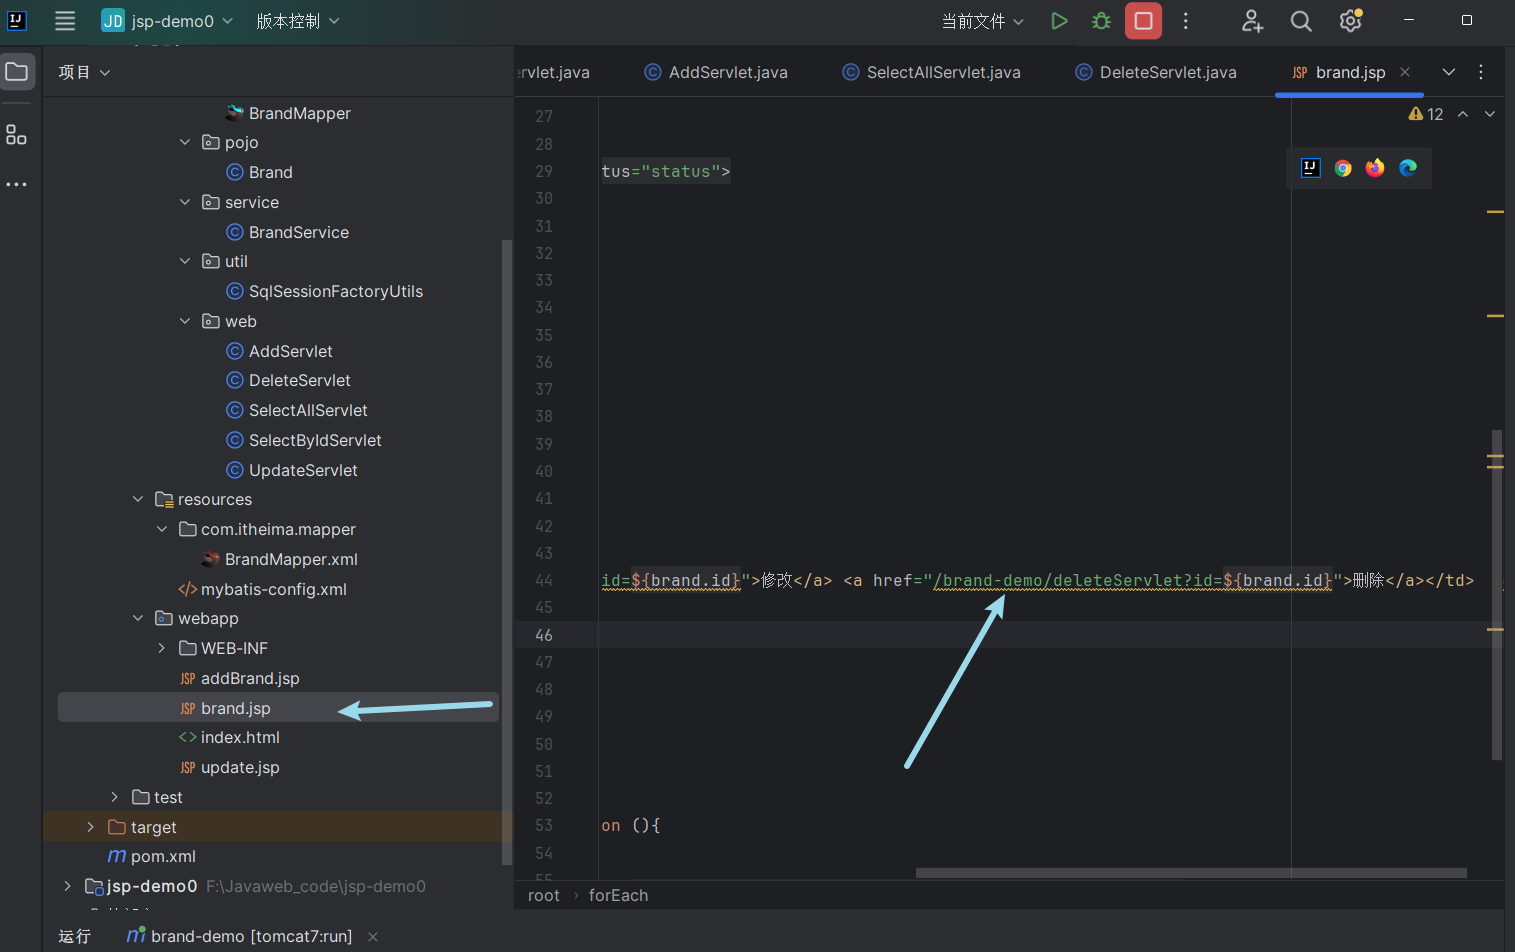
按照修改 写就ok了
 wechat
 alipay